

An Astonishing Before and After Bookcase Makeover
Are you ready to be astonished? If you’re a lover of DIY projects, love all things home decorating, and are looking for an amazing way to transform a room, then it’s your lucky day! Transform a dull bookcase into something spectacular with just paint and wallpaper! Get inspired with this amazing before and after makeover.
I’ve got the perfect idea to make over that tired old bookshelf and turn it into something truly magnificent. With a little courage and creativity, I’ll show you a great way to take an old bookcase and give it new life!

This blog contains affiliate links. This means a small commission is earned if you make a purchase by using this link. The price you pay will be the same whether you use the affiliate link or go directly to the vendor’s website using a non-affiliate link. Sonata Home Design is a participant in the Amazon Services LLC Associates Program, an affiliate advertising program designed to provide a means for us to earn fees by linking to Amazon.com and affiliated sites.
This bookcase was one of our best “adult” purchases as a married couple. We were so excited to bring home!
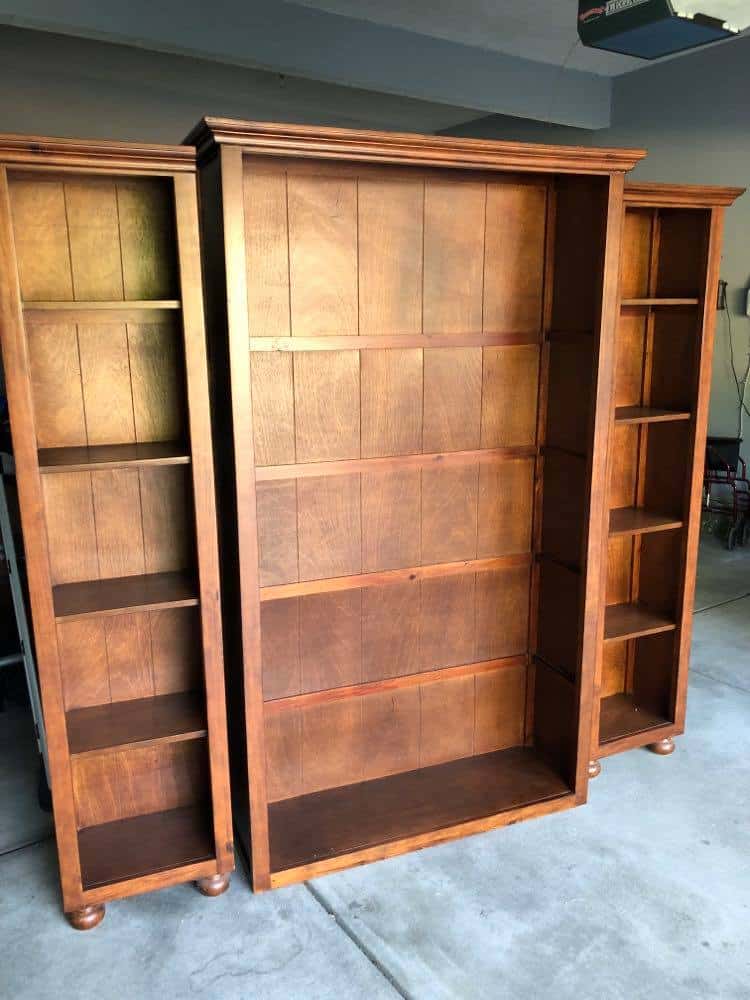
But it has been the equivalent of a family scrapbook for us. Furthermore, I love the lines of the three pieces together.
Sitting in our living room, (and the family room in our prior home), it has held our favorite books…

…tchotchkes from special trips…
We found this bookshelf baby at Sam’s Club almost 20 years ago!
…extra storage for small toys
…and the photographs of our children, friends, and loved ones.
But, it has seen better days.
I have covered many a scratch with a black sharpie pen. (This is actually a great tip! Color in and smudge with your finger!)
Time for a before and after bookcase makeover!
For those of you who love natural wood, don’t panic. This bookcase is not solid wood. In fact, most of the bookcase is particle board with some wood trim. So, I felt like I could really “Go Big” with the transformation.
Paint is usually my go-to for a quick, easy, and budget-friendly makeover. But this is my bookshelf baby and deserves a super special makeover.
We could pay for built-in bookshelves or purchase a brand-new bookcase, but I would not give away this old furniture for anything. Plus, I love furniture transformations!
Instead, I took this basic big box bookshelf unit and gave it a before and after bookcase makeover using only a little paint and wallpaper!
You may own a little bookcase like this or you could look for something similar at a thrift store or on Facebook marketplace
Supplies Needed for This Before and After Bookcase Makeover
- sandpaper
- sander
- latex paint
- paint brush
- wallpaper
- measuring tape
- wallpaper brush or squeegee
- utility knife
- straight edge
- damp cloth
Optional Supplies:
- wallpaper paste if your wallpaper is not a non-prepasted paper
- wood glue and/or wood filler (if repairs are needed)
A Before and After Bookcase Makeover has to start with the “Before”!
As predicted, this makeover will begin with a fresh coat of paint. Which also means…
First, you’ve got to sand it. No need to go crazy. Just a little light sanding to rough up the surface and prep it for paint.
Second, like a good foundation in putting on makeup, I started with a coat of primer. Then came the beautiful bright, white new paint.

I did use a separate primer and paint but you could also use one of the primer/paint combo paints that are now available.
I’ve always loved the bun feet on these shelves.
But oh my! Look at those scratches!
We will call them “love pats” by our beloved cat.
Tip: When painting the feet of a furniture piece, stick them upside down in some leftover styrofoam. They will stay upright for easy painting!

I’m not going to worry about painting the entire bookcase. In fact, I didn’t even touch the back of the shelves.
Why? You ask…

Because of this colorful, amazing, AWESOME wallpaper that will go on the back of the bookshelves!I found this pattern called “Australian Eucalyptus” on an online digital printing company called Spoonflower.
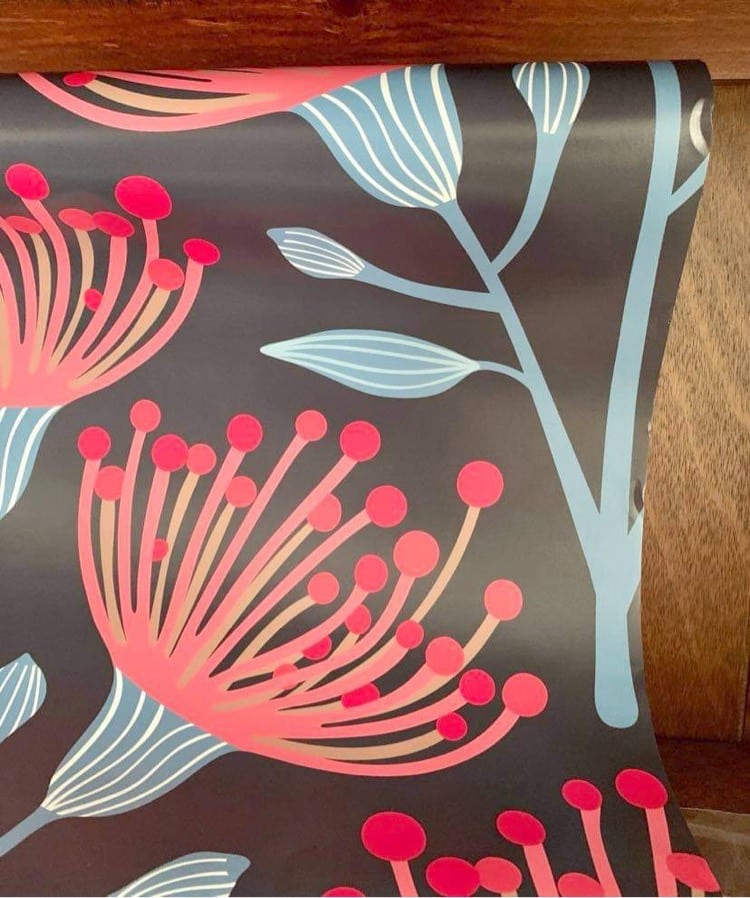
They print custom wallpaper, fabric, and gift wrap using unique and amazing patterns by talented designers.
The pattern I chose is designed by Jackie Tahara of UnBlink Studio. I reached out to her about a version of this pattern that included a little more white detailing. She was so helpful and pointed me in the direction of the perfect paper.
I chose the pre-pasted removable wallpaper option for ease of use and because it fit into my budget.
And because it will give this simple bookcase a whole new look!
How to Apply Wallpaper
Wallpaper can be expensive and the paper I chose is no exception. However, because the project required so little, I felt it was worth a splurge.
Whether you have one expansive section on the back of the bookshelf or have lots of small spaces (like me!), you will need to measure carefully and cut out wallpaper pieces to fit. Depending on the wallpaper pattern, you may want to hang it randomly or try to match the pattern from shelf to shelf.
Don’t hesitate to go with a bold pattern and/or pop of color. A great looking bookshelf is a small footprint in your room and so you are not overwhelming the entire room. Additionally, you can find all sorts of wallpaper patterns at very reasonable prices!
Measure and Cut
Once you measure and cut your wallpaper pieces, wet the back of the paper with a sponge. Then, “book” the paper by folding it in half. (Like a book!) Let it sit for a couple of minutes while the paste activates.

It is a good idea to cut the paper slightly larger than the space. Better to be too big with your pieces and trim later than too small and paper is wasted.
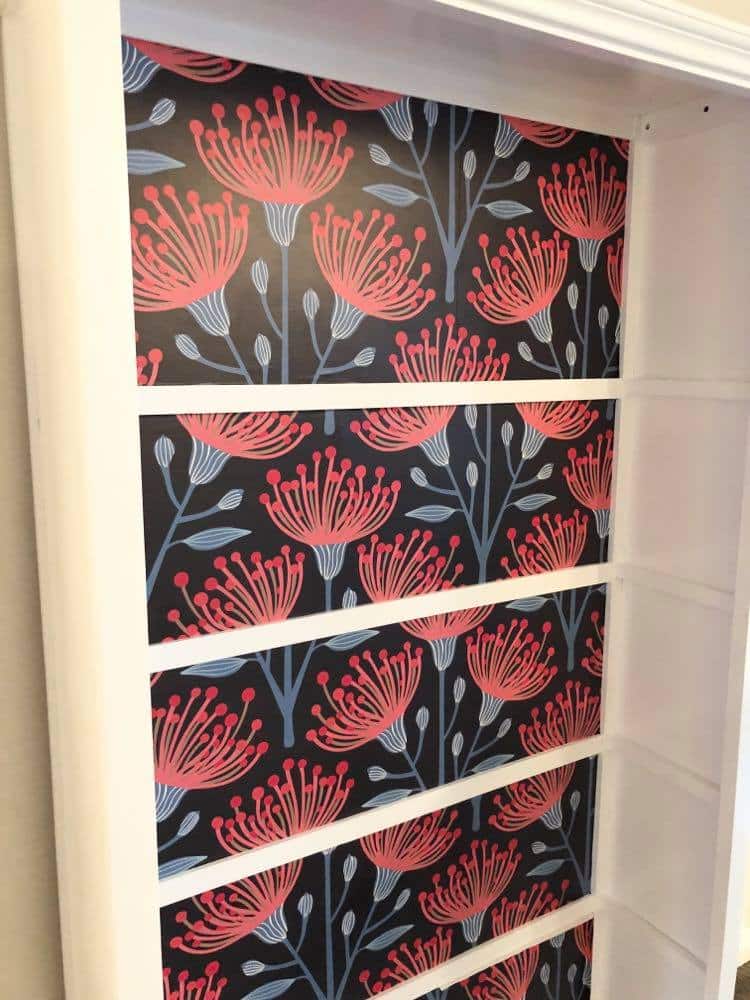
Applying the Wallpaper
Place the wallpaper piece on the back panel and press. Using a wallpaper brush (I often used the edge of my hand!), start in a corner or edge and press outwardly with the brush.
Any bubbles are easily pressed out with a squeegee or wallpaper brush.
Confession: We could not find our wallpaper brush. So, instead, I used a leftover piece of molding that had a perfect edge. It was the best option for a “make it work” moment. And it worked!
Trimming the Wallpaper Edges
Trimming the edges is a breeze using a straight edge and a utility knife (with a sharp blade). The easiest way is to press the straight edge into the shelve right angle and cut across the top of the straight edge with the knife.
My husband trimmed the edges while I added new pieces. Tag teaming is the best!
As we progressed, I got so excited! I was literally “happy dancing” in the living room!
Styling the Before and After Bookcase Makeover
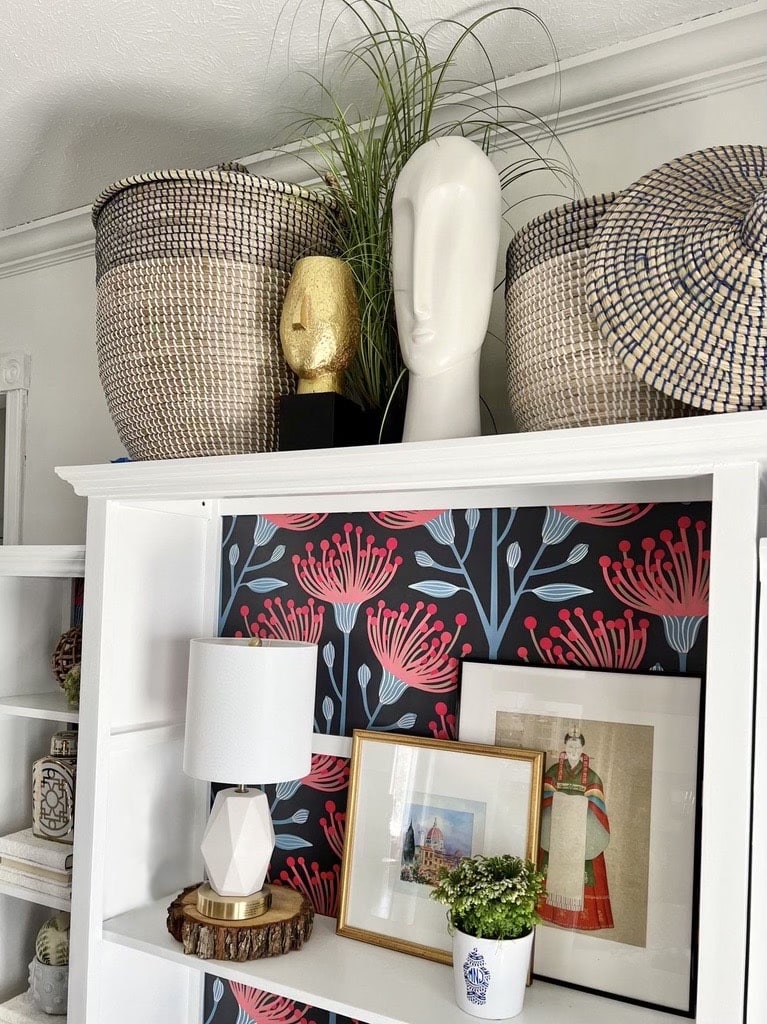
Once we completed lining the back of the bookcase with the wallpaper, the real fun begins!
All of these shelves are ready for styling! Here are some items to consider in styling your furniture upcycle!
1. Books
Of course, there will be books. You could fill the entire bookcase with your book collection. I love using wallpaper-covered books for a cohesive look. (I tuck a labeled bookmark in the book so I know what the book is!)
Stack the books vertically as well as horizontally. A stack of horizontal books also serves as a level to showcase other accessories.


Want to see how I covered the books? Check out this video!
2. Artwork
Whether your artwork is a watercolor purchased at a flea market or your child’s latest masterpiece, frame it, hang it, prop it, and display it!

A visual focal point for our bookcase is this art print that our daughter brought to us from her trip to Japan. I actually left out a shelf to create a larger display space on the upper half of the main shelf to make room for this special piece.
3. Plants
Of course, bookshelves are a great place for plants! They bring life to the shelves and to the entire room!
Plants bring color, texture, and the element of nature to the bookcase.

4. Storage
An easy way to tuck away household items is through baskets and boxes.

5. Home Accents and Collections
Bookends, pots, statuary, Aunt Tess’ teapot collection…you now have the perfect display space to add much character!


6. Something Unexpected
I always like to add a little whimsy and colorful home decor when styling bookshelves. These oversized eyeglasses should do the trick!

The “After” of this Before and After Bookcase Makeover
If you’ve got an old bookcase lurking in dark corners, not to worry!
Now you’ve got the tools to unleash it’s true potential and give it a stylish makeover.

Adorn it with wallpaper or paint it a hue that’s sure to turn heads. Unleash the creative genius inside of you!
Dare to be daring and courageously add color and pattern to an old bookcase!

What can I wallpaper next? Our dog, Bentley, better watch out…he might be next!
Cheers!

Don’t Forget to Pin It!
Pin the image below to your boards on Pinterest (just click the Pin button in the top left corner). You can also follow along with me on Pinterest!

Some Other Bookish Ideas
Simple Steps for Styling Bookshelves
Styling a Bookshelf for Summer
13 Ways to Style Your Bookshelves for Fall
My Wallpaper Obsessions

Not in a DIY Mood? Shop It!
That is quite a makeover! Bold and complete opposite of wood texture. I am a wood lover and would never paint over it. The warmth of wood softens everything around it and generates a feeling of nature coming inside to me. I would be happy in a log cabin in the woods, but I do like the look you accomplished!
Hi Gainor, I also love the texture of wood and struggle with the decision to paint. I think I was emboldened with this project to paint because the bookshelves themselves are not high quality and the backing is really just particle board. (Oh, you reminded me of so many wonderful memories of our summer family vacations in a log cabin in the Colorado mountains. Loved it so much!) Thank you so much for reading and commenting! ~Missy
This turned out so nice! I love the wallpaper and how you decorated the shelves. Thanks for sharing…
Thank you, Karen! It will be so fun to style it differently for each season! I appreciate you and your comment! ~Missy
Oh my gosh! I love it! I would never have thought to use wallpaper to cover books. This pattern looks amazing! I envy those of you who add pattern to your decor in this way and have it turn out so amazing!
Hi Maureen! Thank you so much. I used to be nervous about using pattern in my decor. Once I realized that anything can be changed if I don’t like it, I became much braver. Give pattern a try! Thanks for reading! ~Missy
What a dramatic transformation! This is such a cool and amazing idea! Thank you for sharing it.
Thank you, Melba! I appreciate it! I don’t miss the old shelf look at all! Thanks for commenting! ~Missy
Wow! What a great idea and a wonderful transformation. Hugs to you.
Thank you, Renae! It was a fun one! Hugs right back to you! ~Missy
Love this project, Missy! Thanks so much for choosing my “Eucalyptus” design from Spoonflower! LOVE IT! Jackie
I am so in love with this pattern! Thank you for steering me toward the version that has the added white. It is perfect with the painting book shelves. One of my favorite projects! ~Missy
Love This Missy! What a fun pop of color with the wallpaper choice❤️
Thank you so much, Becky!
Looks fabulous Missy! The white patterned paper you used to cover the books is fabulous.
Thanks, Wendy! Those books are probably one of my favorite “props!”
GORGEOUS
Thank you so much! I’m so glad you like it!
The dog sells this whole thing!!!!!
LOL! Bentley kept getting into the photo shots so I decided to just give him his moment!
Wow, what a creative way to update a bookcase! I love how using wallpaper can completely transform a piece of furniture. It’s a great way to add personality and style to your home. As an SEO Specialist and content writer specializing in UK Market for Loft Boarding services, I often see clients who are looking for ways to maximize their storage space. Loft boarding is a great option for creating additional storage, and it can also be a great way to add visual interest to a room. Do you think wallpapering could be a fun way to update old furniture and add storage space in your home?
What an incredible transformation! The before and after of this bookcase makeover is truly inspiring. It’s amazing how a fresh design can bring so much life and character to a room. I love how the tall bookcases not only provide great storage but also enhance the overall aesthetic. Thanks for sharing this beautiful project!
Thank you so much! Tall bookcases really do add so much to a room! Plus, they are so fun to style and change out seasonally!
What a fantastic transformation! The before and after photos truly showcase the power of creativity and design. It’s inspiring to see how a simple bookcase can be elevated to a stunning centerpiece. This makes me think of how a very narrow chest of drawers could also benefit from a makeover!
Thank you so much, Friend! It was an easy project and a fun way to makeover a bookcase that had seen better days. Have a great week!