

The Best Way to Restore Outdoor Solar Pathway Lights
Bring your outdoor solar pathway lights back to life with these easy and affordable steps. Enjoy the long-lasting, bright illumination of restored solar pathway lights!
Most people love having some gentle illumination in their yard during the evenings, but sometimes those solar fixtures can appear dull or damaged. Don’t worry — there’s no need to purchase new ones! In this blog post, you will learn the best way to restore your home’s outdoor path lighting without spending any extra money on expensive replacements!

This blog contains affiliate links. This means a small commission is earned if you make a purchase by using this link. The price you pay will be the same whether you use the affiliate link or go directly to the vendor’s website using a non-affiliate link.
Newsflash! I bought a new undereye-brightening concealer and am feeling the miracle!
The shadows under my eyes are gone and I seem to have a little more illumination for my everyday, mid-life eyes. Someone even gave me an “eye compliment” the other day. You better believe it made my day! (Read to the bottom of this post for brightening concealer details!)
Let’s compare the miracle of an undereye brightener concealer and solar pathway lights!
Think about it…both brighten, illuminate, and direct (or conceal) shadows in the right direction!
We have LOTS of solar path lights at our house that have “aged out”. (The same could be said about my last undereye concealer!)
But I’m not throwing them out! I’m restoring them to new glory!
As we begin the spring and summer months, the idea of eliminating shadows and adding ambient lighting to the exterior of our home is at the forefront of my mind.
Solar landscape lighting is the equivalent of lighting a completely dark room in your home. You want the right lighting with warm light for a lovely glow but with enough brightness to see the surrounding landscape.
Are solar powered pathway lights worth it?
In the twenty years we have been in our house, we have had several versions of solar path lights and have had good luck with them. However, you might have a very different situation at your home.
Whether solar-powered pathway lights are worth it depends on various factors such as your location, budget, aesthetic preferences, and environmental considerations.

- Location: Lights powered by solar energy are most effective in areas that receive ample sunlight. If you live in a region with consistent sunshine, these lights can be highly efficient and cost-effective.
- Initial Cost vs. Long-Term Savings: While solar power lights may have a higher initial cost compared to traditional wired lights, they can save you money in the long run by eliminating electricity bills.
- Ease of Installation: Solar-powered lights are generally easier to install since they don’t require wiring or access to a power source. This can be advantageous if you’re looking for a DIY solution or if you want to avoid the hassle of hiring an electrician.
- Maintenance: Solar lights require minimal maintenance compared to wired lights. However, you may need to occasionally clean the solar panels to ensure optimal performance. (Keep reading and I will show you how to give them new life!)
- Environmental Impact: Opting for solar-powered lights aligns with sustainability efforts by reducing reliance on grid electricity and minimizing carbon emissions.
- Aesthetic Appeal: Solar-powered pathway lights come in various designs and styles, allowing you to choose options that complement your outdoor space.
- Battery Life and Performance: Consider the battery life and performance of the solar lights you’re interested in. Some models may offer longer illumination times or features like motion sensors for added functionality.
The Aging of Solar Path Lights
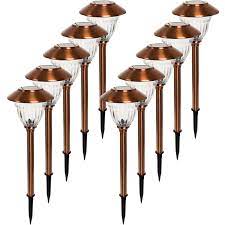
We have some very nice solar path lights.
Lots of them! Enough to surround the perimeter of our corner lot home.
Our solar path lights have certainly earned their keep. Purchased 4 years ago, I think these Energizer stainless steel LED lights are the best outdoor solar lights available.
Having purchased quite a few different solar lights through the years, I have found these to be a good value as the most durable and best option for our hot summer sun, high winds, and winter freezing temperatures.
But, mother nature has had her way and this solar pathway lighting is showing the effects of aging.

Exactly what has aged with these lights?
- The copper finish has faded or even completely disappeared.
- The color is uneven and blotchy.
- Some of the poles are bent and dimpled.
- And, for most of them, the solar panel is cloudy and splotchy.
However, even though they are faded, cloudy, and shabby, I love these Energizer solar path lights!
Why do I think these are the best solar lights?
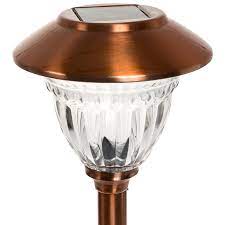
- These lights project a lovely warm white light.
- The tall height casts a far-reaching light
- The bright light is cast in a dramatic but not obnoxious pattern
- The bell shape is traditional yet feels updated
- They were a great value and affordable option with 10 lights in a pack.
- They have withstood our severe Nebraska weather conditions.
- These path lights have been like lovely jewelry illuminating the perimeter of our house.
Why do solar path lights stop working?
Solar path lights might stop working for a few reasons. Sometimes, it’s just a matter of the rechargeable batteries wearing out over time, especially if they’ve been in use for a while.
Other times, it could be due to dirt or debris covering the solar panels, which prevents them from soaking up enough sunlight to charge properly. (This is like my phone camera…I need to remember to occasionally clean the lens!
If you’re having trouble with your solar path lights, a quick check and clean can often do the trick, but if not, you might consider restoring them! Let me show you my favorite solar path light hack!
How to Restore Outdoor Solar Pathway Lights
Rather than buy all new lights, I decided to save my money and restore what we have!
Before you get started restoring your path lights, approach each step with the framework of assembly line tasks. Especially if you have a lot of lights.
Tackling each task like an assembly line kept me focused and efficient as I worked each step.
The first step is to take each light apart, give it a good cleaning with some dish soap and water, and place it in line with the others! I gave each solar panel a quick swipe with some rubbing alcohol to make sure it was clean.

Poles in one pile, light caps in another, and glass domes in another with the caps and screws tucked in underneath so as not to lose them.

Next, tape off the integrated solar panel on each light cap with painter’s tape. Trim the edge around the panel with a knife and you are ready to paint the lights!
Painting the Solar Lights
I rounded up a couple of large pieces of cardboard and assigned light components for each piece.
Light caps on one and screw caps on another. The poles got special treatment by getting stuck into a large piece of styrofoam that was the inner packaging of the computer monitor we recently ordered.
I decided to go with classic black for my color choice. Not only is this a traditional choice, but this color is the best approach for disguising any metal dents or dimples and a great way to give the lights a quick update.
Using a semi-gloss black protective enamel spray paint by Rust-Oleum, I gave each component section 4 light coats of spray paint. I have used Rust-Oleum in so many different projects because they have so many different colors available!
Like this project…A Patio Table Makeover
Or this one…A DIY Outdoor Chandelier
Oh, I loved this project! Dresser Makeover

I probably could have stopped at 3 coats but I want this paint to last a while!
Go ahead and spray right over the taped-off solar panels.
And just keep turning the light poles around and restick them into the styrofoam so you can get both ends covered.
Bentley didn’t quite know what to think!


Did this take quite a while for spray painting and dry time?
Yes!
Was it worth it?
You bet!
How to Clean and Restore Cloudy Solar Light Panels
I learned that, while solar lights still have batteries, the solar panel of the light converts sunshine into power that charges the batteries. So, I needed to create a clear solar panel in order for the sun to do its work.
I have read about many ways to clean cloudy solar light panels but I think I have discovered the easiest and most inexpensive way!
Are you ready? This is the coolest hack!
I love how this solar outdoor lighting casts such a nice warm white landscape path light around our landscape.
Remove the painter’s tape from the solar light…

and give brush the plastic solar panel with a coat of clear nail polish.

You see, clean and clear solar panels are able to capture more light throughout the day. So, applying the clear nail polish was like opening a window to capture the sun!
Spray-on clear lacquer will also work. However, I had clear nail polish in my drawer so that was my “magic” of choice!
Be sure to set them in direct sunlight for at least 24 hours so their solar cells get exposed to as much sunlight as possible.


The Best Way to Restore Outdoor Solar Pathway Lights
Equipment
- 1 solar path light
Materials
- 1 bottle rubbing alcohol
- 1 roll painter's tape or masking tape
- 1 can spray paint
- 1 bottle clear nail polish
Instructions
- Clean each solar light to remove any dirt or debris. Swipe some rubbing alcohol over the solar panel to ensure that it is dirt-free.
- If painting the lights, take apart the path light top from the glass doem and the light pole. Cover the solar panel with painter's tape or masking tape.
- Spray paint the metal components of the lights. Light coats are best!
- Once dry, remove the painter's tape.
- Swipe clear nail polish across the solar panel of each light and reassemble the light.

How Far Apart Should You Place Outdoor Path Lights?
The closer you place your lights, the stronger the illumination will be and the more overlap there will be in the light pattern.
Placing lights 6-8 feet apart seems to be a good distance in order to effectively illuminate a path, flower beds, or landscape border.
I love solar path lights at dusk…magical!

If you are illuminating a walkway, it is a good idea to alternate the lights from one side to the other. This distributes the light symmetrically for bet illumination.
Also, avoid placing the light pole right against the sidewalk or path. The best place is to set the light back a few inches so light reaches more sidewalk area.
How Long Will This Restored Light Last?
My goal is to give these lights at least one or two more years of life. Believe me, if I can make them last longer by reapplying the clear nail polish and additional paint, I’m there!
This is a process of prolonging the life of existing solar lights but it is not a “forever plan.”
Anything beyond that I will consider a gift!
And that’s it – you now know how to give your solar pathway lights a new lease of life!
It’s probably the easiest DIY you’ll ever do, but the satisfaction of having saved yourself a few bucks will be oh-so-sweet.

UPDATE: As of April 2024, we are on the 6th year of using these lights. We are two years with “nail polished” lights and most of them are still working!
As mentioned earlier, this hack is not a lifelong fix but rather a way to gain a year or two more out of your lights. I am happy to report that about two-thirds of our solar lights are still functioning brightly! However, about a third of the lights were located on the west side of the house and really took a beating last summer and winter.
Still, I think this is a pretty good rate of continued glow over the years!
How long do solar pathway lights stay on?
Solar pathway lights typically shine for about 6 to 12 hours with a full charge, but it depends on factors like how much sunlight they get, the quality of their batteries, and the season.
Lights with better components and efficient energy use tend to stay on longer. For the most accurate info, it’s always good to check the manufacturer’s details.
Where Can I Place Solar Outdoor Lights?
Because solar lights have such great ease of use (just stick in the ground!), the placement possibilities are immense!

- Place along a sidewalk
- Outline a flower bed or landscape bed
- Place close a front door step so guests don’t trip in the dark
- Tuck into a flower pot
- Bring attention to a water feature with light
- Sneak into a hanging basket
- Surround a patio table
- Illuminate any outdoor area that is too dark or shadowy
- Highlight an outdoor play area, croquet space, or golf ball putting green
- Pair with string lights and fairy lights for a variety of light sources

So if your solar pathway lights were looking forlorn and down on their luck, no doubt they’ll now be lighting up your garden all night long and giving it a radiant glow. Forget buying new lights; just save money and time by restoring them instead!

Cheers!

I love decorating my home with DIY projects and colorful decor. If you like budget-friendly decorating, I hope you subscribe to my blog so that you never miss one of my projects!
Don’t Forget to Pin It!
Pin the image below to your boards on Pinterest (just click the Pin button in the top left corner). You can also follow along with me on Pinterest!

About that Eye Brightening Concealer…
Since originally posting this, many of you asked about the eye-brightening concealer mentioned at the top of the article. I’m happy to share!
I use the Mally Plush Pen Brightening Concealer.
It takes care of dark circles under my eyes and brightens my whole eye. This came as a two-pack so I keep one by my bathroom room and one in my handbag.
It is a bit of a splurge for me but worth every penny! (My own solar light makeover!)

Some Fun Decorating Projects…
A Pressed Flower Glass Bottle Upcycle Project
29 Ways to Add Colorful Home Decor to Your Interior
The Best Table Runner Ideas for a Round Table

An Astonishing Before and After Bookcase Makeover

What to Put in Decorative Glass Jars
Let’s Go Shopping

Oh my gosh Missy, this is such a helpful diy to restore outdoor lighting rather than give them a toss. Thank you for sharing this! Great post my friend!
Hi Susan! Thank you, my friend! It took an assembly line but it go finished!
Great idea and saves money! Love your tips to restore. Mine lights need a refresh.
Thank you, Tammy! I can’t believe how easy it was and how much money it saved me!
Love the outdoor lights and the light beams coming from them.
I visited you via Sundays on Silverado #143
If you are not already part of SSPS, this is a personal invite to hop over and come and share your posts with us at Senior Salon Pit Stop, every Monday to Saturday.
See my entries: 36+37 and then navigate to the bottom of my page for the Senior Salon Pit Stop linkup, we hope to meet you there virtually.
Thank you, Esme’! I love looking at the solar lights each evening and remembering how much money I saved by giving them a makeover!
I had no idea you could restore these lights! Thank you for linking up on Farmhouse Friday. I’ll be featuring it this week. Hope you link up again soon. pinned
Hi Cindy! Thank you so much for your kind words. They won’t last forever but I think I can get another year or two out of the solar lights! Thank you so much for the feature. You have a great link party and I love being a part of it!
Do you replace the batteries? mine don’t work??
Hi Jackie, I did need to replace a few of the batteries. From what I have found out, it is generally good to replace the batteries once a year. I’m going on year 4 with these and this is first time I’ve had to replace. If your lights don’t work, try changing the batteries on one and see if that makes the difference.Let me know how it goes!
WOWZA, what a great transformation Missy! And who would have thought of nail polish? The Arizona sun is murder on my outdoor items and I have many solar powered fun things in my pots. I am going to have to try this. Thank you so much for all of your wonderful ideas.
Have a wonderful week.
I’m so glad you are going to try this! This little trick gave use two more years out of our solar lights! Have fun polishing!
This is very informative blog , Kudos to your team for curating such a diverse range of pathway lights ideas. It’s truly inspiring! I’m amazed by the variety of designs available for pathway lights showcased on your blog. Truly spoilt for choice!
Oh my goodness. This is what I needed to see. We have a pool area and our solar lights are looking pretty rough. Not thrilled about replacing all of them. But with these instructions, I can just buy a few to add to the existing with makeover!! Pinned.
Thank you for sharing at Gma’sPhoto | ge•ner•ic Linkup Party . Looking forward to seeing you next Friday!
Take care and best wishes.
It is a great way to prolong the use of your solar lights!
This is so helpful. We have a few of these type of lights, and I’ve been replacing them every few years thinking they just don’t last. I’m going to give that nail varnish trick a go next time one is not working. Like you say, if you can get a few more years out of a light like this it’s better for our pockets but also the environment. Thank you so much for sharing this with us at Handmade Monday.
Give it a try, Julie!