

How to Make a Simple DIY Twine Wall Christmas Tree
Are you ready to “Deck the Halls” but are a little short on floor space for a Christmas tree? Or are you looking for a creative way to “Deck the Walls” with a DIY wall Christmas tree? Give a blank wall the star treatment by creating a Twine Christmas Tree in 3 easy steps!
This project allows you to showcase your creativity and create a space-saving alternative to the traditional Christmas tree. Whether you have a small space, are aiming for a specific holiday theme, or are just eager to try something new, this quick DIY project is sure to add a sprinkle of holiday magic to your home!

This blog contains affiliate links. This means a small commission is earned if you make a purchase by using this link. The price you pay will be the same whether you use the affiliate link or go directly to the vendor’s website using a non-affiliate link.
When it comes to holiday decorating, there’s one tradition that never gets old: setting up the Christmas tree!
But what if I told you there’s a fun and space-saving twist on this classic tradition?
Your family Christmas tree, like ours, is probably the central decorating star in your home.
Decorating our family tree has always been my family’s favorite holiday event over the years. It is the Christmas tradition that is merry, bright, fun, and oh-so-precious to us all!

Decorating additional Christmas trees is more of a singular activity for me. It is almost as if an empty tree is a blank canvas on which to paint. Or, more specifically, to bedazzle with ribbon, lights, picks, ornaments, etc.
How about this for a challenge? Creating a DIY Christmas tree from a BLANK WALL!
Why Create a Christmas Tree on the Wall?
There are plenty of reasons to consider crafting this alternative Christmas tree idea!

First and foremost, it’s a fantastic space-saving solution for those with limited room for a traditional Christmas tree. Do you live in a small apartment or just want to save some space for other festive decorations? A wall Christmas tree is the perfect solution!
Second, a wall Christmas tree is an eco-friendly choice. No need to purchase real Christmas trees that get discarded after the holidays, and no plastic trees that fill up landfills. You’re making a sustainable choice that still lets you enjoy the festive spirit.
Additionally, it’s a wonderful way to let your creativity shine. You can customize your wall tree in any style or color you desire. The best part is that it’s a great project for families to enjoy together, creating lasting memories.
Supply List
This easy project can be done with just a few supplies. You will need:
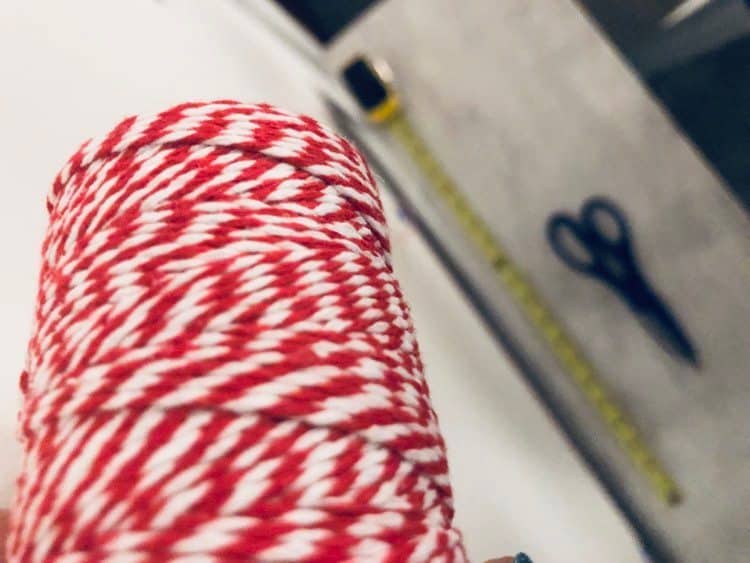
- Twine or String
- Push Pin (with. a large head)
- Painters Tape
- Wrapping Paper
- Scissors
- Yarn
- Pom Pom Maker
- Small table or console
- Evergreen pine garland
The last three items on the list are just suggestions. You might come up with some other amazing things to “hang” on your Twine Christmas tree!
Step One – The Top of the DIY Wall Christmas Tree
The first thing to do is to create anchor points for the top and bottom of your Twine Christmas Tree.
Place your small table against the flat wall. The top of the table is also the bottom of the tree.
Next, decide where the top of the tree will be on the wall and poke one push pin into the wall.
This is the only hole that I put in the wall and it is a teeny tiny one that you can’t see unless you are looking.
Once you push the pin into the wall, wind a continuous loop of twine around it! (Told you this is easy!)

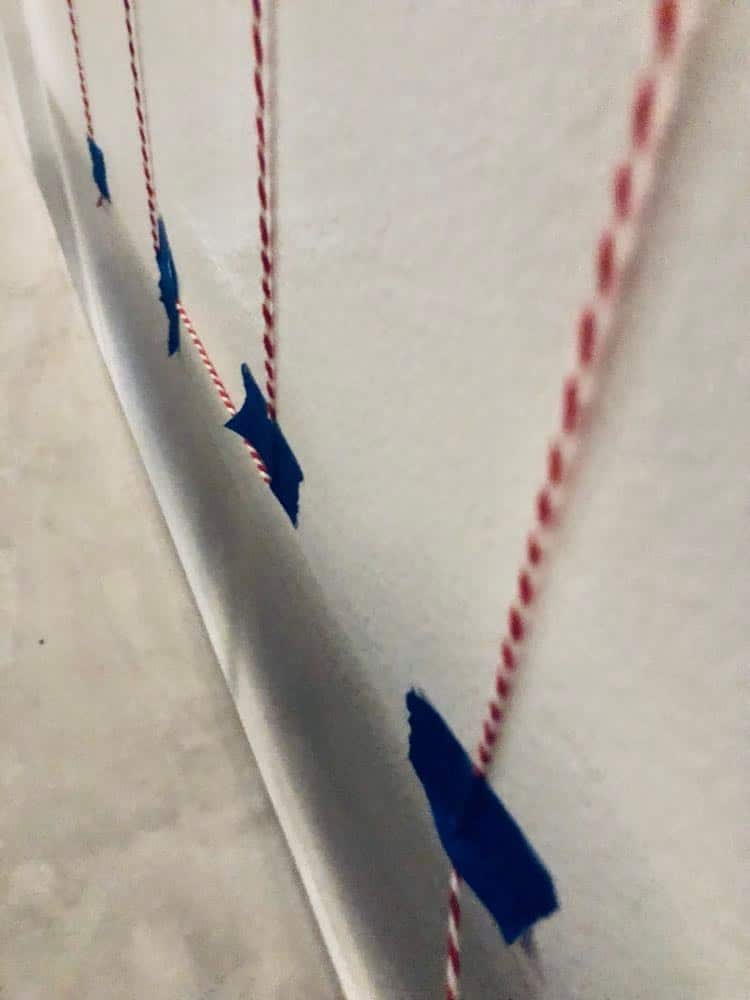
Step Two – Outline the Christmas Tree
Once you wind some string around the top push pin, it is just a matter of laying the twine in vertical lines in the shape of a Christmas tree on the wall.
Starting from the top, pull the twine down and at a diagonal. When you decide on the height of your tree, simply secure the twine with painter’s tape at the bottom of the tree outline. (Don’t worry. We’ll disguise it later!)
Don’t cut the twine! Rather, move the twine over a few inches, secure it to the wall with painter’s tape, and pull the twine upward toward the top pin.
Wrap around the pin and head back downward. Continue with the same outlining/taping process until you have laid out the vertical lines of a Christmas tree shape.
Step 3 – Decorating a Flat Christmas Tree
Now that you have the shape of a tree outlined on the wall, it is time to decorate the tree!
The trick is to find items that can effectively take the place of three-dimensional ornaments.
What could be better than wrapping paper and pom poms?

Simply cut out ornament shapes from your favorite holiday wrapping paper to the wall. While I stayed with round shapes, you can cut your paper into any shape you want. In fact, mix it up with different ornament shapes in larger and smaller pieces. Tape them to the twine and the wall by looping pieces of tape underneath the paper ornament.
The wrapping paper provides color and pattern as a festive tree “ornament.”
The bright colors of the paper, twine, and pom-poms tie in perfectly with all of our other Christmas decorations. Be sure to add a larger pom-pom as a fluffy tree topper!

Making Pom Poms
Adding yarn pom-poms to your Christmas wall tree is a great way to color, texture, and dimension to the flat surface.
I started to tie the pom-poms to the twine but, after wrestling with it a bit, found out that the tape held it up perfectly! Because pom-poms are heavier, it will take a larger loop of tape to secure them to the wall. I was afraid they might fall but they stayed put!
Pom-poms are so easy to make and are actually quite addictive once you get the hang of them. I love to use them in all sorts of decorating projects…like these Boho Pom Pom Pillows.

You can buy a pom pom maker kit for about $10. Make it a family affair as both kids and adults love making pom poms! You can see a pom pom kit HERE.
I started to time myself…I can make a medium size pom-pom in three minutes!
Here is a quick video showing you how easy it is to make pom-poms for your Twine Christmas Tree!
Hiding The Painter’s Tape
Now, I promised that no one would actually SEE the painter’s tape.
Take some faux or fresh greenery and lay it across the top of the table, covering all signs of the painter’s tape. You can decorate the garland with actual Christmas ornaments, fairy lights, and other holiday decor.
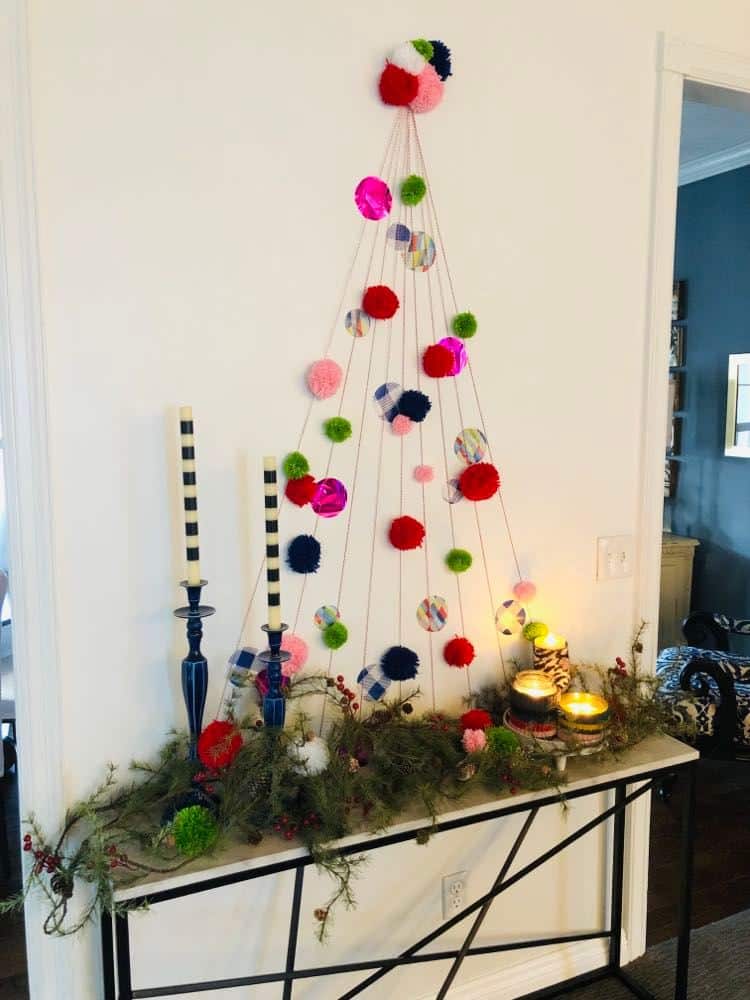
These jar candles are wearing adorable sweater sleeves that I made from an old cardigan of mine. The “sleeves” are the perfect shades to match the papers and pom poms!
You can see How to Make Sweater Weather Candles Sleeves HERE.

So festive!
Where Can I Use This DIY Wall Christmas Tree Idea?
The beauty of this project is that it is a festive focal point that works so well in smaller spaces. Try one of these spots to add some Christmas cheer to the wall!
- Small apartment
- Dorm room
- Guest bathroom
- Child’s bedroom (Little kids love having their own tree!)
- Child’ playhouse
- Above a fireplace mantel
- Mudroom or laundry room

A traditional tree with Christmas lights and ornaments is still a cherished tradition in our home. But this easy DIY project is a great thing to add to the usual holiday decorations. This twine wall Christmas tree is not just a beautiful craft project; it’s part of the joy and creativity that the holiday season brings!
May your home be filled with laughter, love, and the magic of the season. Here’s to a twine-tastic Christmas!
Cheers!

Pin It to Remember It
Pin the image below to your boards on Pinterest (just click the Pin button in the top left corner). You can also follow along with me on Pinterest!
More Christmas DIYs

How to Make a Felted Wool Ball Trivet

DIY Holiday Dog Collar and Tie
I’m even getting our dog, Bentley into the holiday mood with this fun and easy craft project!


Missy, this is amazing! I love it. Very creative and colorful! I love that this can be done in pretty much any home or apartment! Well done! Susan
Thanks, Susan! My daughter who lives in a tiny apartment in NYC should try this! lol! Thanks for being a part of the blog hop!
How adorable! This would also be great on an interior door! Love it!
What a great idea, Annemarie! This gives me ideas on other places to try it! Thanks for reading and thanks for “hopping!”
This is so fun and out of the box Missy.
I love how you transformed a plain wall into a festive focal point in your home.
I also love how easy and inexpensive it is to create.
Thank you for sharing your beautiful ideas with us.
Thanks, Wendy! I appreciate your comments so much! It is definitely fun to “deck the halls!” easily and inexpensively!
This such a clever idea. Love that it can be used pretty much anywhere and tailored to any taste. Happy to hop with you!
Thank you so much, Marie! Blog hops are always so fun!
This is such a cute idea, Missy! I love your use of color!
Thanks, Marieza! It was fun “hopping”with you!
such an adorable idea! I love it! This would be great in an assisted living or nursing home if they didn’t mind if we put a small hole in the wall! thanks for sharing!
You are so right! Great idea! Thanks so much for reading and hopping!
What a fun and creative idea! It’s so pretty!
Thank you so much, my friend!
Oh my goodness Missy this is such a fantastic idea!!! I love your creativity! It is always so much fun blog hopping with you!
Hi Crystal! You make my day! Thank you so much! Aren’t blog hops fun!
What a cute idea! So festive!
Thank you so much, Christin! I am so ready for Christmas decorating!
I like the helpful info you supply to your articles.
I will bookmark your blog and check again right here frequently.
I’m rather sure I will be told plenty of new stuff proper here!
Good luck for the following!
I love it! What a fun and easy idea.
Hi Joanne! We love fun and easy, don’t we!
This is absolutely adorable, I love it! I’d love to invite you to share on Tell It Me Tuesday, you can find this weeks here: https://perfectlyimperfect-lwl.com/tell-it-to-me-tuesday-24-11-28-23-link-party/
I will be there on Tuesday! Thank you so much!
Your wall twine Christmas tree is genius! It’s so fun and unexpected, plus storage is a total bonus!
This looks great! Thanks for sharing with Create-it Link Party https://tryit-likeit.com/link-party-it/