

An Amazing Before and After DIY Fireplace Makeover
Is your fireplace looking a little tired, sad, or outdated? If you’ve ever pondered this question while gazing at your existing fireplace, you’re in the right place! In this blog post, I’ll unveil a captivating before and after DIY fireplace makeover that will spark your inspiration and ignite your home hearth dreams.
We took our boring builder-grade fireplace from drab to fab! Get ready to be wowed!

This blog contains affiliate links. This means a small commission is earned if you make a purchase by using this link. The price you pay will be the same whether you use the affiliate link or go directly to the vendor’s website using a non-affiliate link.
How about a fireside chat? A chat about a fireplace makeover using bold and dramatic tile.
As in, let’s talk about our “before” fireplace and how a dramatic tile made all the difference in a room.
You see, our old fireside was not a place that said “Sit down and chat, read a book, etc.”
It was a sad fireplace.
Our Before and After DIY Fireplace Makeover
This “before” photo actually horrifies me more now than it did before the makeover.
I think it was probably a beautiful fireplace when this 1995 home was built.
The bones are good!
It has a decent fireplace mantel, neutral tile, and a functioning gas fireplace insert.
It just didn’t have as much character as I would like.
And, oh dear! There is the dingy color, the soot marks that no amount of scrubbing can remove, and the general “tiredness” of the whole thing.
Sad, sad, sad.

Even our stockings hanging cheerfully at Christmas time have a dingy look because of all the tile discoloration.

Since we were redecorating our living room, it made sense to give this baby some TLC. You can see this Living Room Revamp here.
Planning this Fireplace Makeover
I wanted to give this fireplace a whole new look and decided that a strong yet classic tile was the answer!
Since I always love a dramatic decorating moment, choosing a bold tile is a great idea for creating a defining and beautiful focal point for the entire room.
However, while I wanted “bold”, I also wanted to retain a classic element in the chosen pattern.
My sister and I discovered this black and white houndstooth pattern at The Tile Shop in Omaha. They have rows and rows of tiles from which to choose.

An entire aisle was devoted to black and white patterned tile. (Can we call this the “Missy Aisle?”)
I found other tiles I really liked, but the houndstooth kept calling my name. So I purchased some full-size samples (including the houndstooth!) and brought them home to see how they look in the room.
While I knew immediately that the houndstooth would be the winner, I’m so glad I brought home a sample.
This tile looked stark white and black under the store lights but had a more grey-white cast once home in our light. Actually, the grey-white works better in our home as the walls are painted Sherwin Williams Pure White and needed a variation on the white scale.
Designer Tip: When choosing tile, always purchase a sample and bring it home to try in the space!
Black and white tile seems to hold a special place in our hearts. See how we used black and white tile in Our Kitchen Renovation and in our Primary Bathroom Renovation!
Prepping the Existing Fireplace
Before we started tearing into the old tile, it was important to prep the fireplace and the surrounding space.
We placed plastic sheeting around the fireplace area and gave the mantel and side panel of the fireplace a good sanding.
Preparing a fireplace for new tile involves several steps to ensure a successful and long-lasting installation.

Depending on your project, here are steps to take in prepping your fireplace for new tile.
- Remove Existing Materials: Carefully remove any old tiles, grout, or adhesive from the existing surface. Use a chisel, scraper, or adhesive remover as needed.
- Clean the Surface: Thoroughly clean the exposed surface by removing dust, dirt, and debris. A clean, smooth surface is essential for proper tile adhesion.
- Inspect for Damage: Check for any damage or cracks in the underlying structure of the fireplace. Repair any issues to ensure stability and safety.
- Level and Patch: Fill in any uneven areas or gaps with a patching compound to create a level surface. This is crucial for a smooth and uniform tile installation.
- Priming: Apply a suitable primer to the surface to promote proper adhesion. The type of primer may depend on the material of the fireplace and the adhesive you plan to use.
- Layout Planning: Determine the layout of the tiles to ensure they fit properly and make any necessary cuts ahead of time.
Fortunately, the old tile came off pretty easily using a claw and a hammer. Another bonus was that the cement board was in great shape!
Be sure to wear gloves and protective eyewear when removing tiles!
It was, truly, so exciting when the old tile was removed! It already looked brighter…insulation and all!

Adding the New Fireplace Tile
Once the tiles were off, we sanded the fireplace mantel and wood sides of the fireplace. The mantel has a dental-style crown molding so it took a little while to get into all the nooks and crannies!
This is where we brought in a tile professional. The initial placement of the tile took some time because of the intricacy of the pattern. However, this was not the time to rush through the job. Our tile professional was meticulous with the pattern!


Bentley…scouting out his napping spot!

There were several shades of grout color to choose from. While, initially, I was thinking of a deep black, we finally settled on a lighter charcoal grey color that blended the black and white really well.
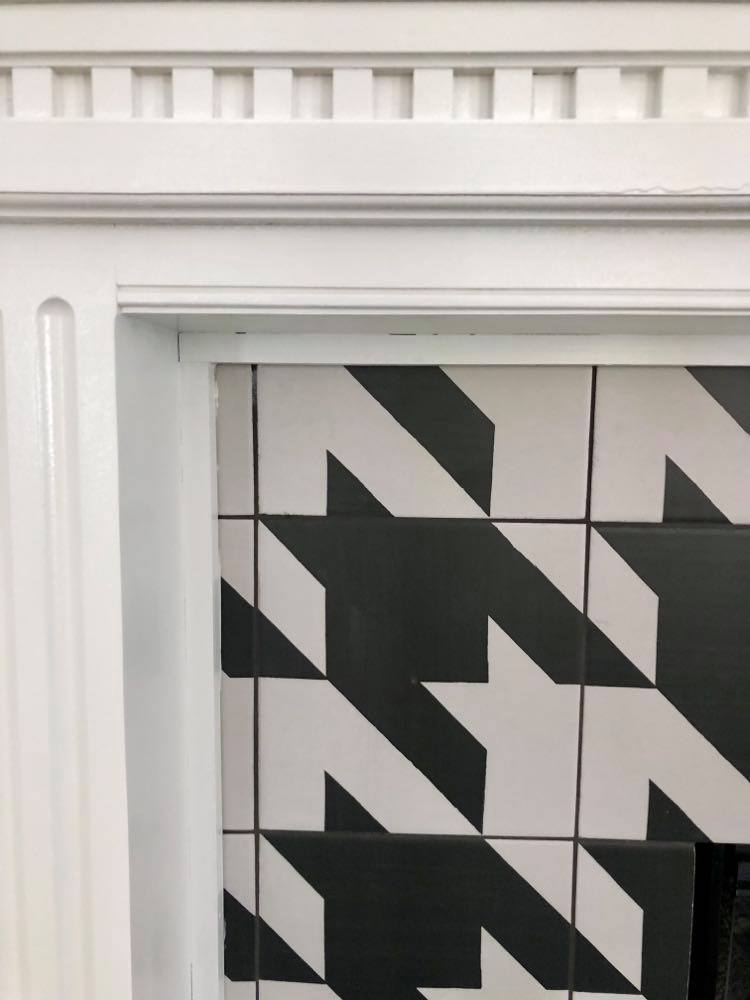
Tip: When choosing your grout color, make the decision as to whether you want the grout lines to recede or “pop.” In this case, we chose to have the grout “define” but “recede.”
Even the glass fireplace doors got a makeover. The glass frame (formerly gold) was spray painted black to blend with the tile. The brown door handles were spray painted a hammered gray.
Spray painting the handles made such a big difference in the doors! And so easy!

The Fireplace “After” Makeover Reveal
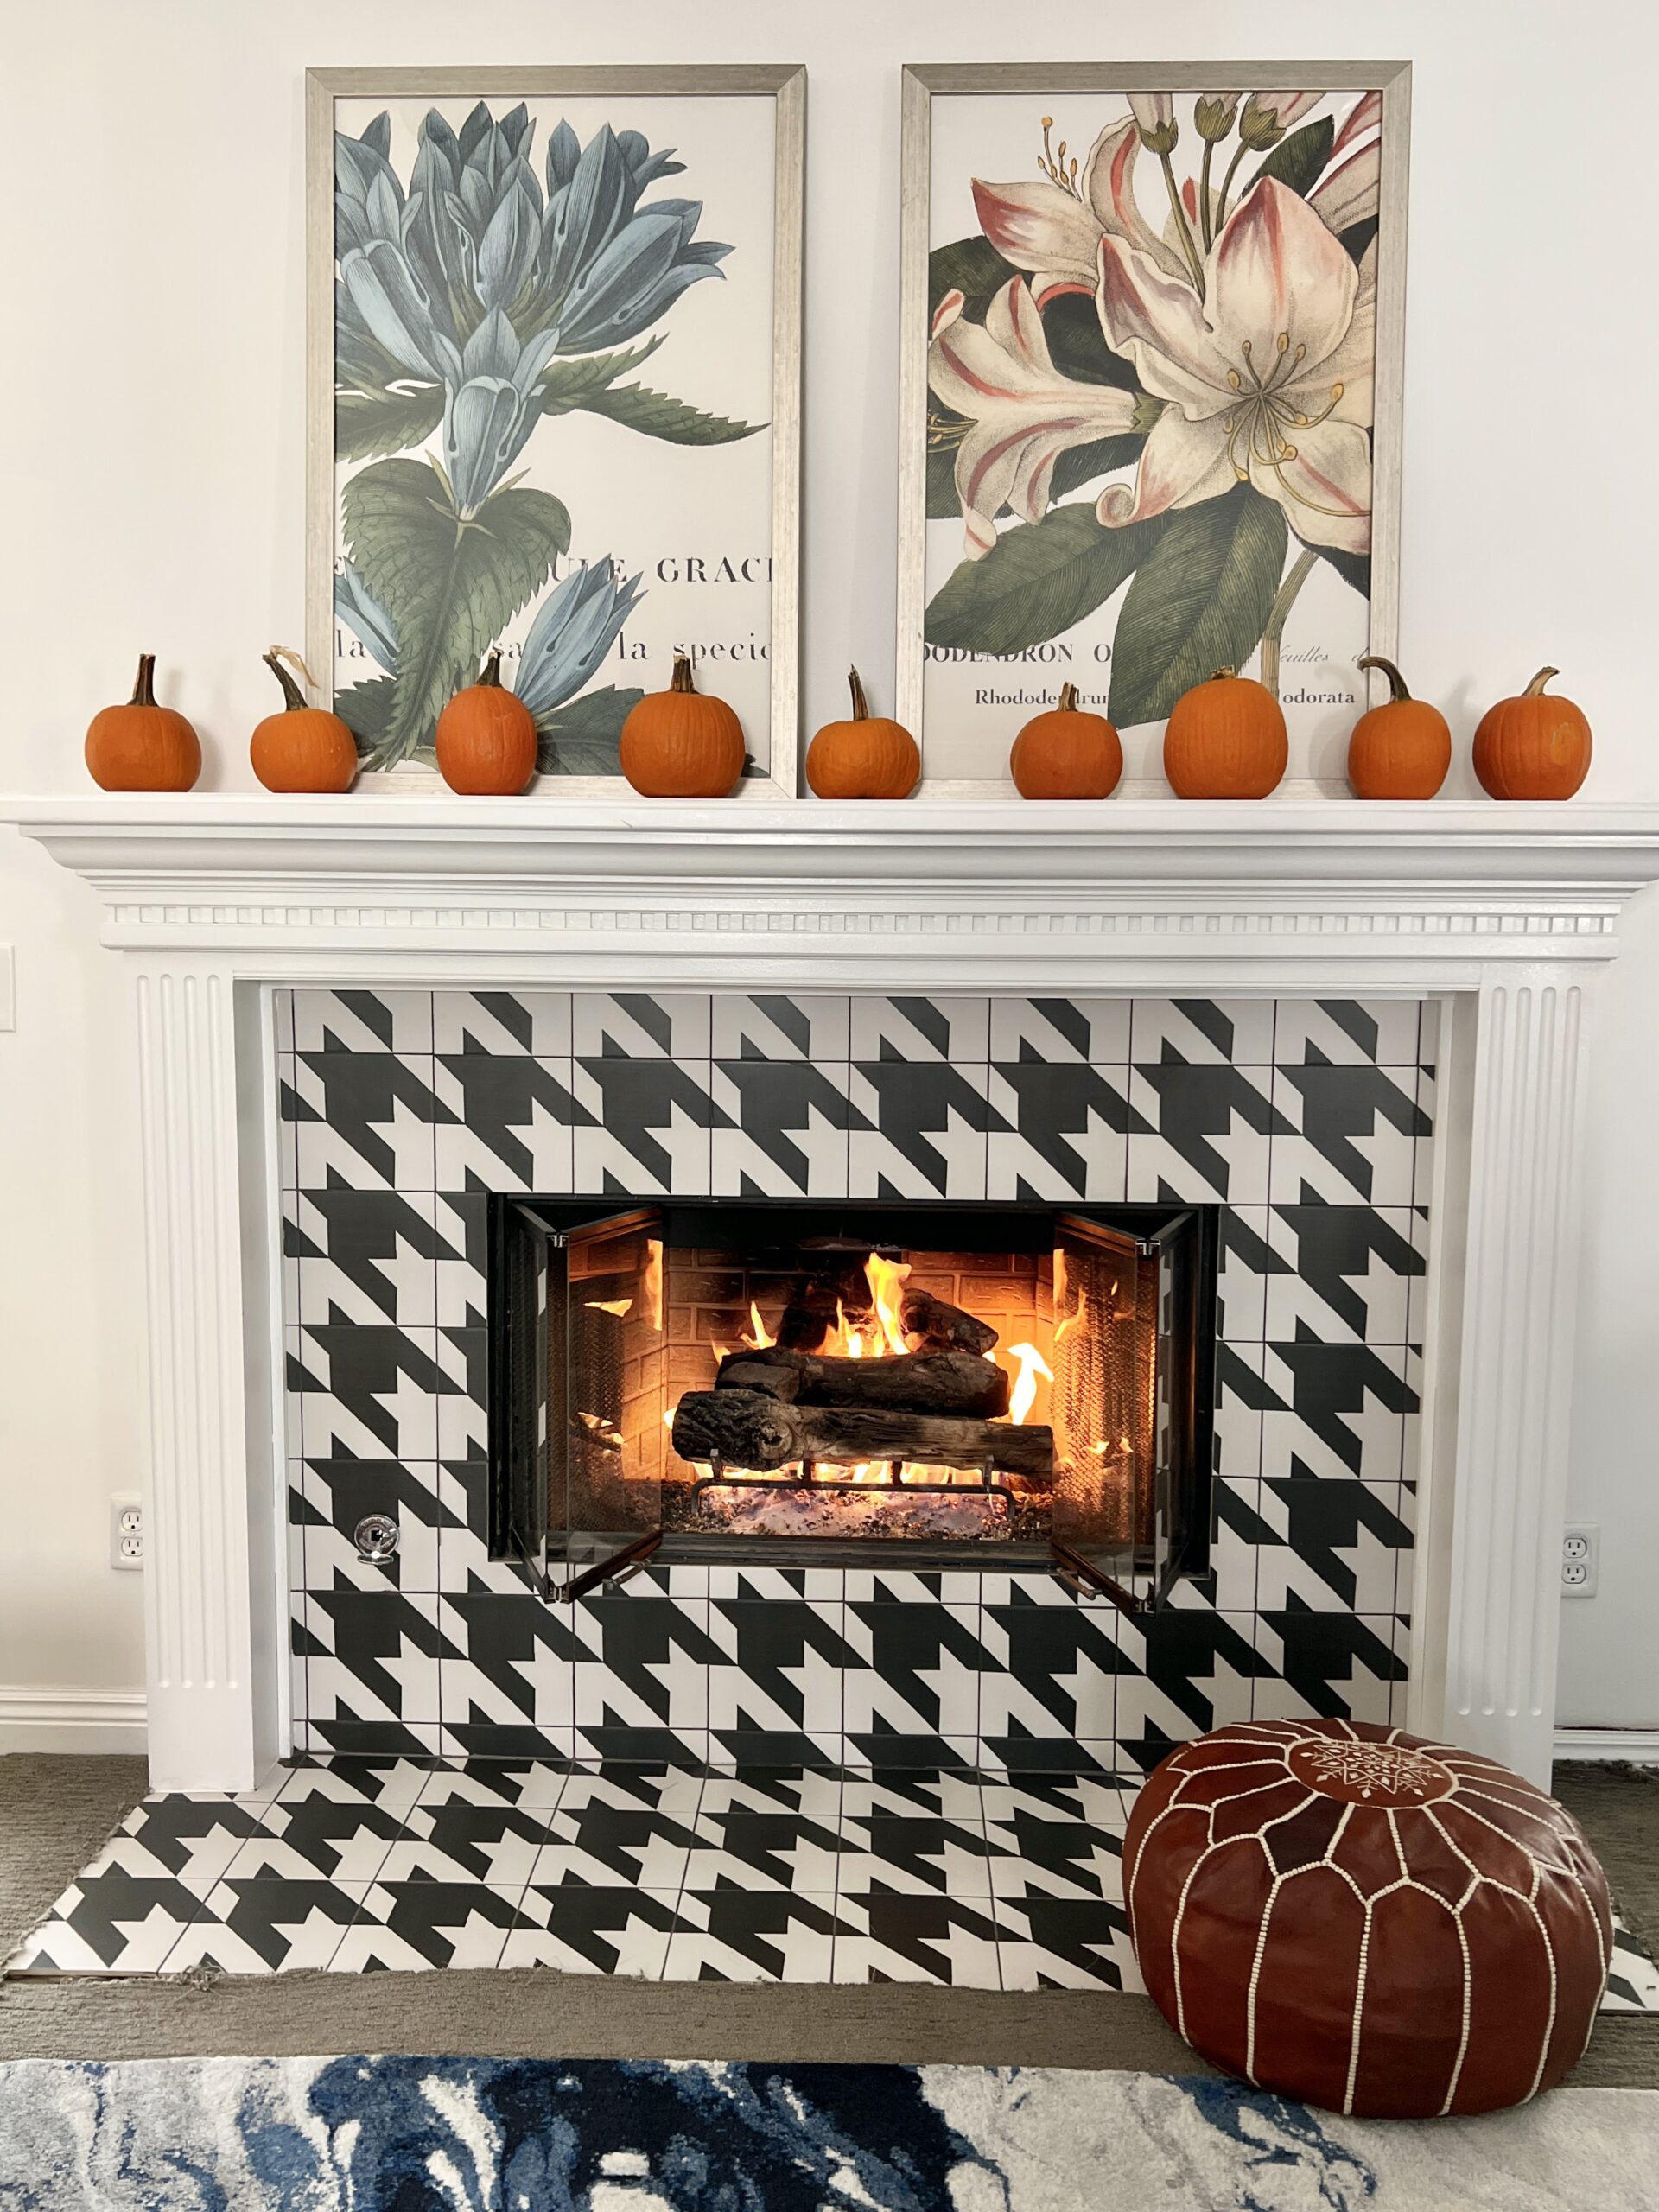
This was a bold choice in tile and may not be for everyone. However, I have not regretted it for a moment, and love, love, love our new fireplace!
I think it goes to the point that you shouldn’t decorate your home like a renter! Decorate for what you love instead of who might buy the house years down the road!
The bones of the fireplace have a classic look but the bold tile gives it much more visual interest as well as a fresh, contemporary look. Styling the fireplace is so FUN now!
We completed this makeover in the fall so I propped a couple of botanical prints atop the mantel with some fall pumpkins arranged to pull color from the prints.

The view of the fireplace is, truly, so lovely from all angles!

The houndstooth pattern is bold and dramatic and really pops against the white walls. It also provides the perfect backdrop for other colors, textures, and patterns.

Before and After DIY Fireplace Makeover on a Budget
The cost of our fireplace makeover came to about $800. The main cost was the tile itself and the labor cost for installing the tile.
Every fireplace is different and there are lots of ways to give your fireplace a makeover on a budget. Take a look at these ideas!
- Paint it: A fresh coat of paint can instantly revitalize your fireplace. Choose a color that complements your room’s decor.
- Tile Overhaul: Update the look of your fireplace with affordable peel-and-stick tiles or inexpensive ceramic tiles.
- Mantel Magic: Build or update a mantel to give your fireplace a whole new character. Consider using reclaimed wood for a rustic look.
- Whitewash Effect: Create a whitewash or limewash finish for a shabby chic, farmhouse-inspired appearance.
- Faux Stone Veneer: Add a touch of elegance with lightweight faux stone panels that mimic the look of real stone.
- DIY Built-ins: Frame your fireplace with custom-built shelving and cabinets for extra storage and a polished look.
- Decorative Screens: Use a decorative fireplace screen or cover for an instant style upgrade.
- Budget-Friendly Surround: Install a wooden or MDF surround with crown molding for a traditional and timeless feel.
- Painted Brick Facade: Paint the brick in a contrasting color to create a bold and modern statement.
- Accessorize: Enhance the fireplace area with budget-friendly decor items like candles, mirrors, or artwork that accentuate the new look.
Remember, a budget-friendly makeover doesn’t have to skimp on style. With a little creativity and some DIY effort, you can achieve a stunning transformation for your fireplace without breaking the bank.
Fireplace Holiday Decorating Ideas
While the focus of the fireplace is the amazing tile, the whole fireplace now lends itself beautifully to mantel styling and seasonal decorating!
A great option for styling the wood mantle is to keep it simple! Candlesticks in various heights, a dough bowl full of green moss orbs, and a trailing green plant can add warmth to the family room while enhancing the fresh new look of the fireplace.
You know it is fall when you bring out the pumpkins! Again, simplicity reigns with a charming line-up of orange sugar pumpkins on the wood mantel. At just a few dollars each, this is a very budget-friendly way to decorate a fireplace with autumnal impact!

Even Halloween gets some attention with some flying black bats emerging from the side of the fireplace. I love how the bats resemble the houndstooth and fit right in for a spooky effect!

Ring in the holiday season with color!
This DIY multi-colored Christmas ornament wreath is actually made with a pool noodle! Bright cone-shaped and bristle bottle trees create a merry “forest” across the mantle and a large basket with a cozy throw just says “Merry Christmas”!

Let’s not forget Easter! The sculptural flocked bunnies are a great example of strong color balancing strong pattern. Peter Cottontail definitely likes hanging out by the fireplace!

This DIY hanging heart project is perfect for decorating a fireplace mantel for Valentine’s Day. It is also a perfect way to show a little love in our great room year-round!

In the world of home transformations, a fireplace makeover can truly be a game-changer!
Now that you’ve seen our before and after DIY fireplace makeover, I hope you’ve been inspired to tackle your own fireplace project. Whether it’s a modern makeover, a rustic revival, or a complete style overhaul, your fireplace can be a reflection of your personality and the focal point of your home.
So, won’t you stop by for a fireside chat? Stay awhile! I’ll get the hot chocolate!
Cheers!

Don’t Forget to Pin It!
Pin the image below to your boards on Pinterest (just click the Pin button in the top left corner). You can also follow along with me on Pinterest!

More Home Remodel Projects

A Kitchen Renovation Project – How we went from dark to light and discovered hidden space!

Our Primary Bathroom Remodel – We took out a giant corner whirlpool and ended up renovating the entire bathroom. It was so worth it!

Bold and Beautiful Half Bath Makeover Ideas – This project was for the Spring ’23 One Room Challenge. Wow! Did I have fun with some dramatic and colorful wallpaper!

Shop My House

I love how you take so many different design pieces and pull ithem all together with such an artistic eye! Timeless and classic!
You are so sweet, Maureen! Thank you! Timeless and classic can always us a little punch! Thanks so much for reading and sharing!
Wow! What a transformation. I love that pattern.
Thanks, Renae! Houndstooth is one of my favorite patterns!
What a great update and transformation Missy. Love the pattern!
Thank you, Susan! Houndstooth is one of my favorite patterns!
This is TOTALLY YOU, Missy!!! It looks amazing with all your other decor and is decorated beautifully for the seasons!! Thanks so much for sharing at Home Imagined this week!
Thank you, Rachel! Some people have a signature handbag…I guess I have signature fireplacce! LOL!
I love houndstooth in and every textile – I’ve never seen houndstooth tile though 😀 how awesome is this?!! What a great fireplace makeover!
Thank you, Michelle! I am HUGE lover of houndstooth so this tile really called my name! Thank you for stopping by!
Love that you went bold! Your pooch matches the tile in your home- so fab hee hee. All of your holiday decor ideas are very fun, bunnies especially.
Thanks, Marie! We sometimes joke that we chose our dog to match the fireplace. Not true but it they are a nice match! Thanks for stopping by!
What a great update Missy! love the black and white houndstooth tile, it gives your fireplace so much character.
Thank you, Wendy! I appreciate it!
That really is an incredible makeover!
Thank you, Joanne! That is so nice of you!