

How to Make Dazzling DIY Mirrored Outdoor Hanging Decor
Add some dazzle to your outdoor space with eye-catching mirrored hanging decor, made from recycled CDs. Get the step by step tutorial here!
Mirrored hanging décor is the perfect way to make an eye-catching statement in your garden or patio. Not only will this stunning decor reflect natural light and brighten up any space – it also uses recycled materials! Get ready to transform your backyard with this showstopper!

This blog contains affiliate links. This means a small commission is earned if you make a purchase by using this link. The price you pay will be the same whether you use the affiliate link or go directly to the vendor’s website using a non-affiliate link. Sonata Home Design is a participant in the Amazon Services LLC Associates Program, an affiliate advertising program designed to provide a means for us to earn fees by linking to Amazon.com and affiliated sites.
Decorating outdoor spaces is just as fun as decorating indoor spaces!
After all, patios, decks, porches, and gardens are spaces that, weather permitting, we love to live in!
The “flooring” and “walls” might be open-air, but incorporating decor outside is just another way of expressing your decorating personality through colorful home decor.
Outdoor Hanging Decor from Recycled Bling
I do like a little “bling!”
Whether decorating a holiday tree or pining for some dazzling jewelry, my eye just gravitates toward some dazzling sparkle.
This project’s bling is free…
…because it is made from recycled CDs!
Cds? I’ll bet you’ve got a box of them stored somewhere!

If not, ask a friend for their leftovers or grab some at a thrift store.
And while you’re at it, grab a cardboard box!
You need just a few more things. Best of all…you probably have all of this at home already!
Supply List
- Old CDs
- Cardboard (an old cardboard box works!)
- Frog Tape
- Newspaper
- Flour
- Water
- Metallic Silver Spray Paint
- Scissors
- Hot Glue Gun
Building the Frame of Your Outdoor Hanging Decor
You will want to decide on the shape of your outdoor hanging decor.
For this project, let’s go with a butterfly!
Using a free online template or drawing freehand, draw the shape of two butterflies of the exact same shape and size onto a piece of cardboard.
I used a free template that I found online but then sketched the shape slightly larger than the pattern so my butterfly would be a little bigger.
With a utility knife, score and cut out the two butterfly shapes.

Also, draw and cut a strip of cardboard that is about 1″ in width and is long enough to completely wrap around your butterfly.

Get your tape ready! I like to pre-tear the tape so it is ready to go as I work.

Take the 1″ cardboard strips and tape upright at a 90-degree angle onto the butterfly.
Bend and curve the strip as needed so that you are accurately edging the inside outline of the butterfly.
Take the second butterfly cutout and tape it to the top of the cardboard strip creating an enclosed butterfly. Once that edge is taped, tape the outer edge of the other side as well.


You could jump to the tiling from here but I thought I would give this butterfly some dimension by building out a torso.
Twist some paper (grocery sack!) into a “body” and tape to the box.


Time for Paper Mache
Remember when you woud paper mache a balloon as a kid? I loved the part where you popped the balloon!
Well here we go again!
Combine a 1:1 mixture of flour and water and then add additional water to get the glue consistency that you want. I like a thinner glue so added more water.
Cut or tear strips of newspaper and begin to paper mache the outside of the butterfly box.
Dunk the paper strip in the glue, wipe off the excess, and apply it to the box. Apply three layers of paper mache and let dry thoroughly. I let mine sit overnight.


Once dry, spray paint the butterfly with metallic silver paint and let it dry.
My, there is a lot of “drying” in this project!
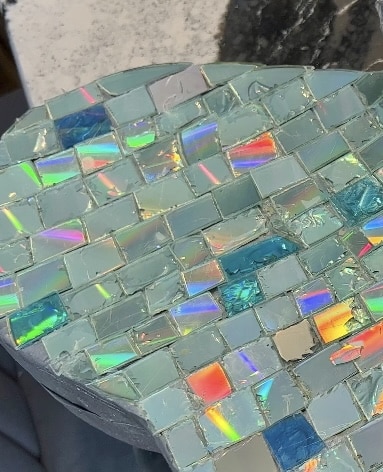
Cutting the Disco Ball Tiles
Remember the old CDs?
Throw them into a bowl of warm water, and let them soak for about 10 minutes.
You read that correctly…soak the CDs in warm water!

In the meantime, grab your protective eyeglasses (safety first!) and a pair of scissors.
Begin to cut the CDs into small squares. Because they were soaked in warm water, cutting them will be slightly easier.
However, not gonna lie, the cutting is not always smooth sailing and you need to cut a LOT of squares. I did end up with a couple of blisters on my “scissor hand” (there is resistence!) so did end up wearing some gloves for cushion.


Tiling the Butterfly
Using a hot glue gun, begin to glue the square tiles to the butterfly. I recommend gluing a straight line (plumb line) of tiles across the front of the butterfly so you have a straight line guide.

That being said, you can glue the tiles in any arrangement, pattern, or style that you like. Once you have the front and back done, glue tiles to the sides.

You might need to cut or “carve” some tiles into smaller or angled shapes in order to fill all the gaps. However, because the butterfly is painted silver underneath, don’t worry about perfection. No one will notice small gaps when you finish.

Hanging Your Outdoor Mirrored Decor
We are still pre-spring around here so the grass has not turned green yet.
However, just hanging this dazzling butterfly on our front porch gave me all the spring vibes!

We do have an arborvitae tree that is green year-round so I tucked my little friend into the branches!
The sun was out and there were so many different colors reflected in the tiles!

This can hang indoors too!
This sunny spot is in my craft studio and is a sparkling companion for my Urban Garden Prints butterfly!
The butterfly was self-spinning as I photographed it in my craft studio…it was a kaleidoscope of color!

After all the steps have been completed, you can proudly step back and admire your butterfly decor. It’ll flutter in the breeze and paint rainbows of glitter with its wings in the sunlight!
This project is perfect if you want to fill your outdoor living space with life while utilizing some of those old CDs you’ve been hoarding. And it’s also great fun since it involves fusing together materials that don’t usually find themselves tangled up together.

So go ahead and break out those CDs, draw out your butterflies, and get ready to show off some dazzlingly unique outdoor decor. In no time at all, your backyard will be glowing in the beautiful light of the newly created butterflies.
Add some sparkle to your outdoor living spaces with some dazzling hanging decor!
Cheers!

Don’t Forget to Pin It!
Pin the image below to your boards on Pinterest (just click the Pin button in the top left corner). You can also follow along with me on Pinterest!

Favorite Finds for Spring

Beautiful idea, I need to try this as soon as possible 🙂
This project did challenge my patience a little bit because it takes so many of the cut cd pieces. But it was so worth it!