

Using Nail Polish as Paint for DIY Abstract Pumpkins
Are you looking for a new, creative way to welcome the autumn season? Something that is unique and will give your home a stylish flair? Look no further! Using nail polish as paint is a fun way to create beautiful DIY abstract pumpkins.
These creative decorations are a conversation starter for anyone who sees them and is sure to make everyone smile. Plus, the best thing about them is that you can use nail polish as paint! I’ll show you exactly how to create stunning nail-polished abstract pumpkins in just a few simple steps!

This blog contains affiliate links. This means a small commission is earned if you make a purchase by using this link. The price you pay will be the same whether you use the affiliate link or go directly to the vendor’s website using a non-affiliate link.
Pumpkin Meets Nail Polish
I have a couple of childhood memories that are now strangely connected…
One memory is of me painting my fingernails in an attempt to make my stubby (and chewed) fingernails look like my mother’s pretty hands.
The other memory is of carving my Halloween pumpkins: two triangles for eyes, one triangle for a nose, and a mouth with one straggly tooth.
Two straggly teeth if I was feeling particularly creative!
As an adult, I have stopped chewing my fingernails (I discovered the joy of professional manicures!) and my creativity with pumpkin decorating has been boosted tenfold!
See my pretty nails creating this fun pumpkin kissing ball project! I’ve come a long way, baby!

Pumpkin love begins in September and continues through Thanksgiving. There are so many amazing and creative ways to decorate a pumpkin to go with your home decor and holiday decorating.
With this DIY art project, I have been able to elevate my childhood version of a decorated pumpkin and offer something a little more in line with my home and love of color.
All it took is using nail polish as the main ingredient!
Using Nail Polish as Paint
Painting pumpkins has become a very popular craft project. Why not use nail polish as paint?
Think about it….there are so many fun colors to choose from and you can pick up a bottle inexpensively at any drug store or dollar store.
You might even have some old nail polish rolling around a drawer at home somewhere…I know I do!

Such a great idea!
Not making a connection between a pumpkin and nail polish?
How about using nail polish as paint for an elegant, abstract pumpkin using nail polish?
This fun project will give new meaning to the phrase “nail art!”
Let me show you how!
Supplies
This is a pretty straightforward list…
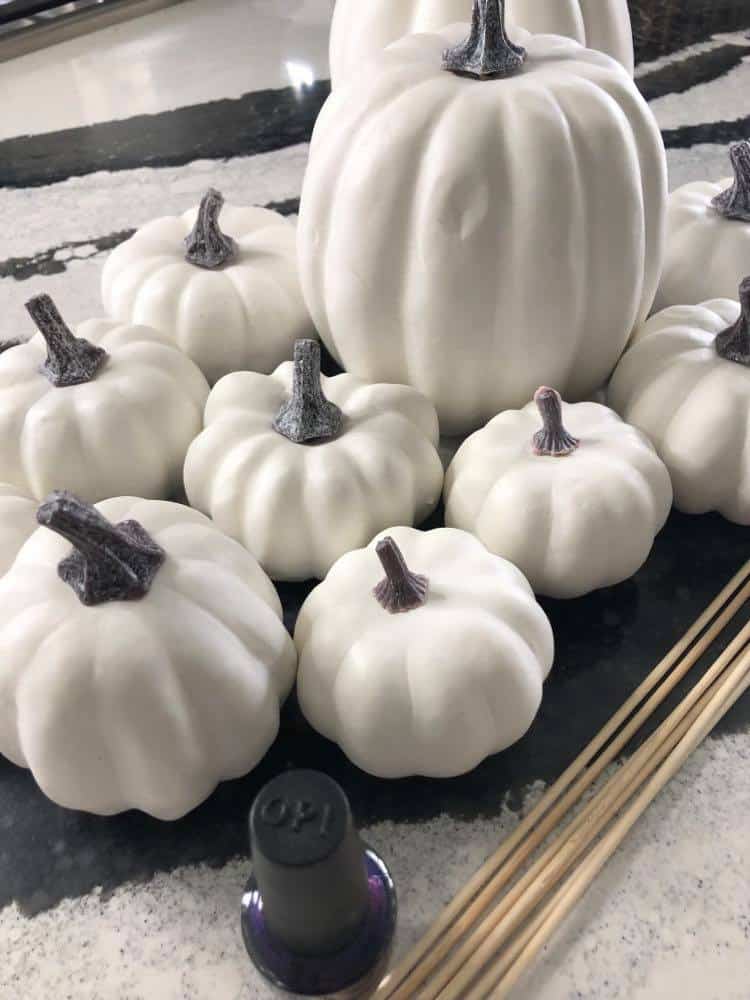
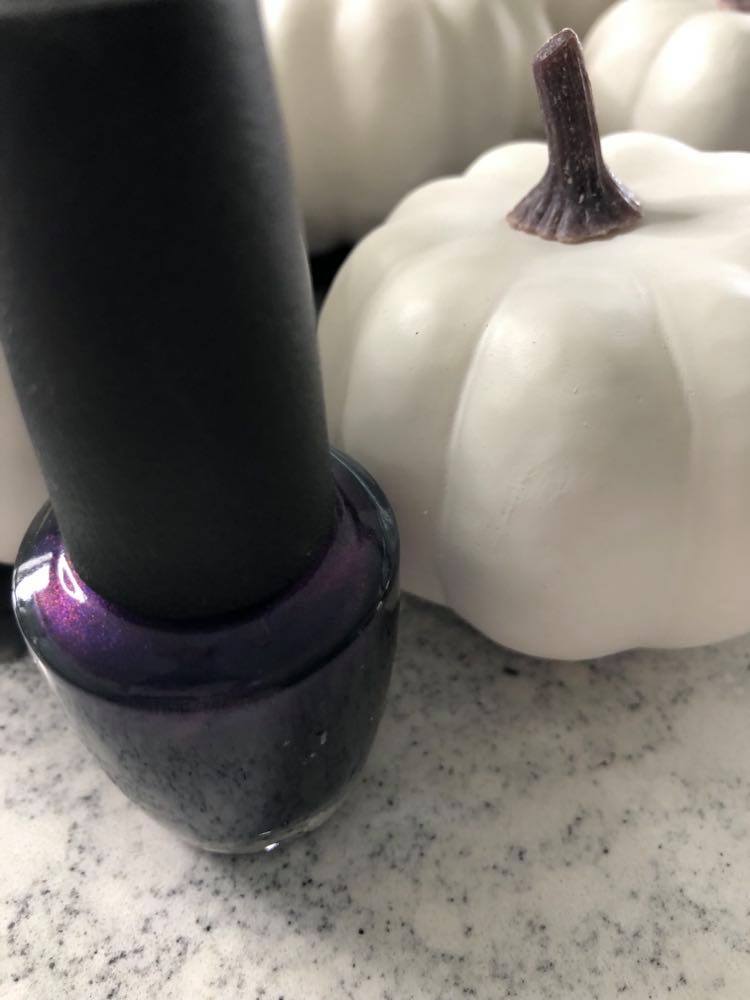
- Nail polish – Go with whatever color you like! I opted for OPI nail polish in “Russian Navy”. (you can see it here) Choose your favorite color!
- Plastic container
- Wood stir stick (I ended up not using it but it might work for you.)
- Pumpkins – These can be real or faux. I found some at the dollar store but their overall color was too yellowish for me. The ones I ended up using are from Amazon and I loved how crisp white they are. I even love their curly stems! You can see them here.
- Wax paper – (You can use a paper towel but you risk losing some of the paint.)
- Optional: disposable gloves
- Optional: a bottle of clear nail polish
You can use any shade of nail polish that you want!
Painting Pumpkins with Nail Polish
First, fill a plastic container with lukewarm water. Once 3/4 full, add just a small amount of nail polish. 5-6 drops is what I used to start.
Believe it or not, this is probably the trickiest part of the entire project. If the water is too cold, the nail polish will ball up and drop to the bottom of the container. Too hot and the polish will not disperse enough.
It’s a little like Goldilocks and the Three Bears…you want the water “just right!”
For best results, take a little time to play with this by experimenting with a few drops of polish. You will know right away that you’ve got it right when you see the drops disperse on the top surface of the water.
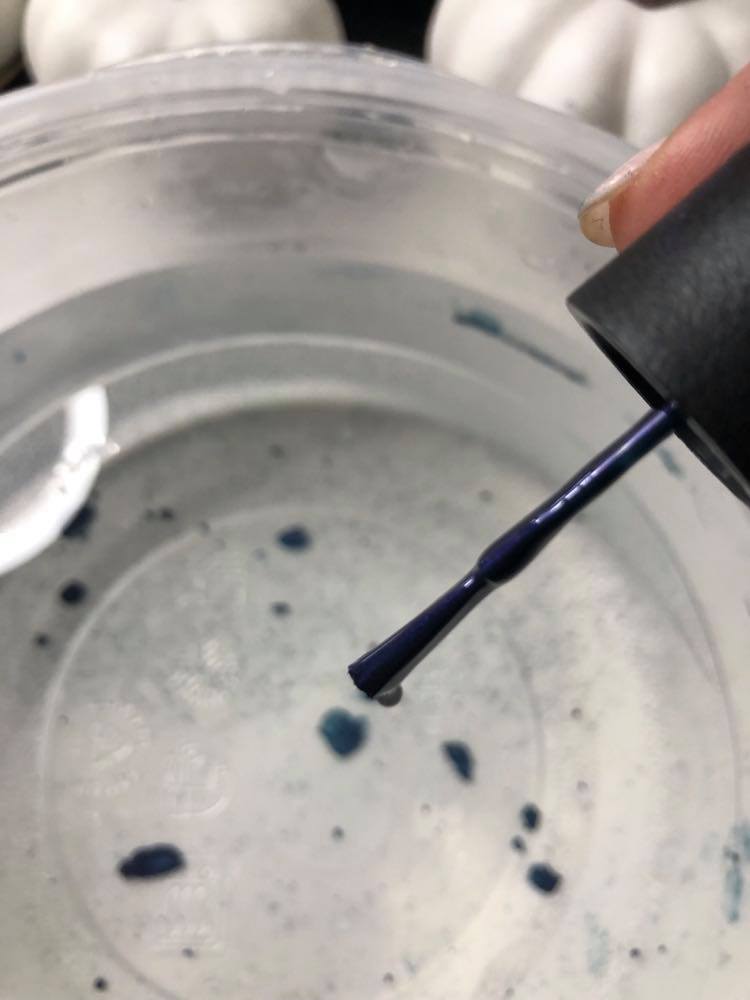
Next, shake the bowl a bit and the drops will start to disperse even more. You can use a wood stir stick to move the polish around the top of the water. However, I found that, in my case, the polish just stuck to the stick and did not disperse.
Dunking the Pumpkin
Now for the fun part! Grab your pumpkin by the stem and dunk it in the water!
Swirl the pumpkin around quickly and watch the polish grab hold of the sides of the pumpkin.
If you don’t get enough “swirl” for your taste, dunk the pumpkin again for a second coat.
Take a look at this 5-second video to see a classic “dunk!”
Remove from the water and let dry on some wax paper for about 15-20 minutes on each side. Be patient with the drying process as you don’t want wet nail polish rubbing off on everything!
If you like, once the pumpkins are dry, you can paint them with a top coat of clear polish for a glossy finish.

As a person who usually likes to control every paint stroke or infinite detail in a project, this was amazingly satisfying to just dunk and remove with such careless abandon!
The pumpkins emerge with a really cool random and abstract pattern!

So, for the cost of some faux pumpkins and a bottle of nail polish (about $20 altogether), you can create a stunning set of abstract pumpkins.
How to Get Nail Polish Off Your Skin
I wish I had known this when I first tried this project. I walked around with blue fingers for three days!
Try one of these for a quick fix if you get nail polish on your fingers.
- Keep a little nail polish remover and cotton swabs nearby. If you get a small amount of polish on your fingers, the remover should take it off.
- If you have sensitive skin, soak your fingers in some soapy water and dry gently with a towel.
- Believe it or not, toothpaste is a great way to remove nail polish. Just add a bit to a towel and rub it onto the skin to remove the polish.
- Be proactive and wear thin gloves to avoid getting too much nail polish on your hands.
Display Ideas for Your Abstract Pumpkins
- Place in a basket on your kitchen island for a pop of color.
- Display on a tiered cake stand.
- Paint your pumpkins in a variety of colors and line up on your porch railing.
- Include with your Halloween decor
- Use your pumpkins as place cards or as a centerpiece on your Thanksgiving table.
In this photo, the pumpkins take on a rather macabre vibe with dark background lighting. Great for Halloween!

On the brighter side, the pumpkins offer a cheery “Hello” from the front porch!

With just a few simple steps, you can create stunning abstract designs on plain pumpkins using nail polish. It’s a fun and easy way to bring the beauty of painted pumpkins into your home without having to purchase them from any expensive store.

Plus, as you customize your pumpkins with unique swirl patterns, your family and friends will be amazed by what you created. (My mother loves to show these to her friends!)
Nail polish isn’t just for your nails. Paint your pumpkins and decorate your home for fall in a whole new way.
Happy dunking and swirling!
Cheers!

Don’t Forget to Pin It!

Other Easy Craft Projects for Fall


Make Plastic Pumpkin Stems Look Amazing!


These came out so nice Missy! I love the colors you chose.
Thank you, Wendy! It was fun!
I am here from Thistlekeeping. Your pumpkins are so pretty! This is a terrific idea!! I must try it!
Hi Suzy and welcome to Sonata Home Design! I’m so glad you like the pumpkins. They really were fun to make and so EASY! Let me know how it goes if you try it! Thanks so much for reading and stopping by! ~Missy
Lots of good information here.
madizzhome – https://www.madizzhome.com
Thank you so much!
Holy cow, Missy!!
These are incredibly unique!! I’ve never seen this marbling technique used before and I love it! What a super neat and creative idea for pumpkins. Thanks so much for sharing at Home Imagined this week!
Thank you, Rachel! I always enjoy your link party and I love sharing these nail polish pumpkins!
Oh, Missy! I love these so much! Pinning!
Thank you, Leslie! Honestly, I was a little skeptical at first but they are SO easy and they came out looking so unique. I guess I need to give up control more often! LOL!
These look like marble Missy! Gorgeous!
Thank you, Cindy! It was a such a fun project and I agree..they do look like marble!
These came out so well. I love the ‘Goldilocks’ comment!
We love things that are “just right!” don’t we? Thanks so much for stopping by!
What a FUN tutorial, Missy!!
We will be featuring you starting Wednesday at the Creative Crafts Linky Party! Pinned and shared!
Creatively, Beth
Thank you so much, Beth! I love sharing this project and am thrilled to be featured!
Absolutely amazing – love the pattern the nail polish created on the pumpkins. Well done.
I visited you via Let’s Dare to Share!
I linked up this week with = 49+50. This is a friendly reminder and invitation to come and join us at SeniorSalonPitStop. You will find the linkup information under BLOGGING
Thank you so much, Esme! This is such a fun project and I love sharing it!
Those are so gorgeous! I’m happy to tell you I’ll be featuring this great post at Thursday Favorite Things today. 🙂
Thank you so much, Pam! I am honored!