

Thrift Store Decor Ideas: Creative Upcycles with Decoupage
If you’re looking to refresh your home on a budget, thrift store decor is one of the most creative and affordable ways to do it.
And whether you’re a seasoned treasure hunter or just dipping your toes into the world of secondhand items, decoupage is a great way to upcycle and breathe new life into your thrifted finds, adding color, pattern, and personality to almost anything.

This blog contains affiliate links. This means a small commission is earned if you make a purchase by using this link. The price you pay will be the same whether you use the affiliate link or go directly to the vendor’s website using a non-affiliate link. As an Amazon Influencer, I earn from qualifying purchases.
Thrift Store Decor Find
Let’s talk thrift store decor—specifically, how a mysterious box from a local thrift store went from “is that an urn?” to a bold, beautiful centerpiece in my living room.
Yes, friend, we are going there.
I was minding my own business (as one does) at my favorite local thrift store—the ReStore, to be exact—when I spotted what can only be described as a bougie little box.

I say “little,” but it’s actually quite a large decor piece.
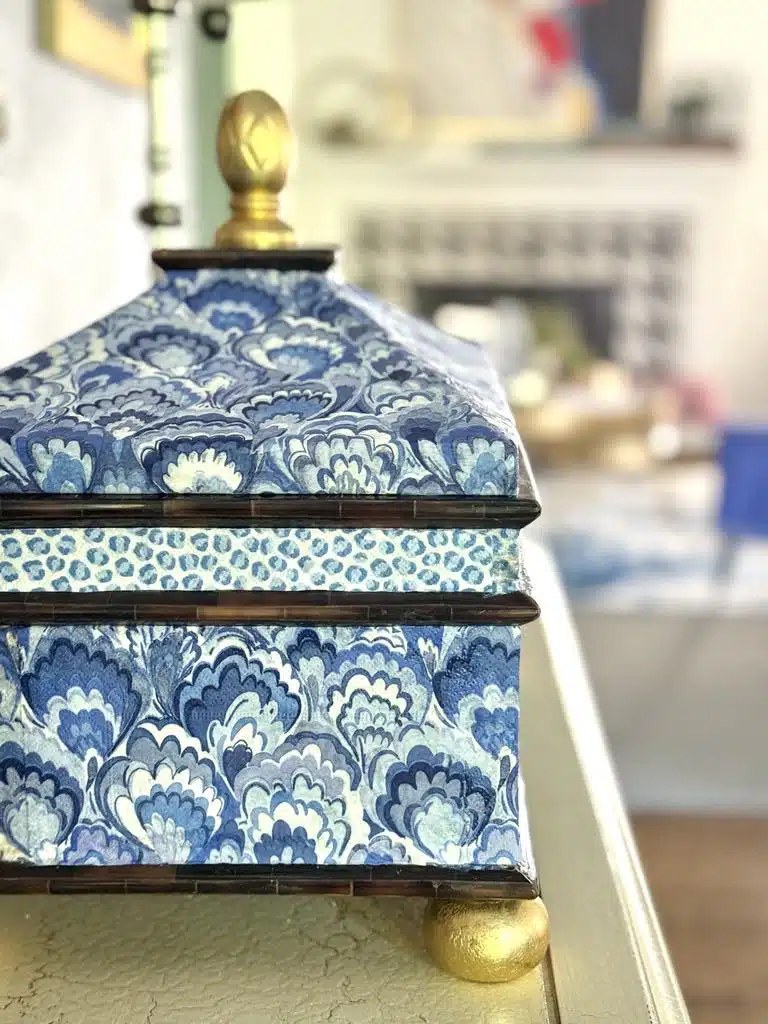
This thrifted gem was heavy (like “if-you-drop-it-on-your-foot-you’ll-know-it” heavy), had a gold knob on top, shiny gold legs, and a tortoise shell trim that practically whispered, “I used to be fancy in the 90s.”
The surface resembled a faux travertine finish, which is… fine. But let’s just say travertine has never been my go-to—no offense to those of you who love it!

Still, the classic shape won me over, and for a great price, it made its way into my cart.
The Handcrafted Society Challenge
It’s time for The Handcrafted Society!
Designed by our host Wendy at WM Design House, this is a group of creatives who takes on a monthly project challenge with a specific medium or theme in mind. This month the medium is…anything with pattern. We’re talking my language!
When I heard the theme was pattern, I knew exactly what I wanted to do. This thrifted box had been waiting patiently for a makeover, and its classic shape made it the perfect candidate.
Be sure to read to the bottom of the post to see all of the amazing patterned projects by my fellow Handcrafted Society friends!

The Family Weighs In…
Now here’s where it gets funny. I bring my find home, gently set it on the ironing board (nearest surface!) like the treasure it is, and prepare to revel in the thrill of the hunt.

Cue my daughter (the one with a love of neutrals and the ability to make beige look fabulous). She walked in, took one look, and said, “Ooh, don’t touch it! It’s perfect as it is.”
My husband? Not so much.
He raised an eyebrow and declared, “That looks like something you’d put ashes in.”
YIKES. Talk about mixed reviews.
Being the peacekeeper that I am (and a color-loving maximalist at heart), I took the middle ground: I wouldn’t toss the box or leave it untouched. I’d give it a new life—with a little creativity and a lot of decoupage!
The Medium of Choice: Decoupage!
If you’ve never decoupaged before, hop on board!
It’s one of my favorite ways to add personality and a vintage look to just about anything—from glass bowls to picture frames, even light fixtures! For this project, I went straight for my favorite things in the paper napkin world.
After a recent thrift haul, I had two napkin patterns I’d been itching to use:
- A blue and white marble pattern (bold and fun!)
- A blue and white leopard dot napkin that also included a fresh green and white geometric pattern.

I had originally hoped to use the blue and the green patterns, but in the end, the blue and white won the spotlight. Don’t worry—the green and white geometric is tucked away for another DIY project.
How to Decoupage Using Paper Napkins
Whether you’re working with thrifted items or something from your own stash, here’s how to transform an ordinary piece into something extraordinary:
What You’ll Need:
- Mod Podge (or other decoupage medium)
- Paper napkins (separated—use just the top printed layer)
- A soft paintbrush or foam brush
- Scissors
- primer (optional)

Step-by-Step Decoupage Instructions:
Not everyone can find a fabulous 90’s style lidded box/urn like me!
However, the following decoupage technique can be used on just about any thrifted decor piece you can think of!
Clean It Up
Take the time to clean your thrifted decor item thoroughly. If it’s glossy (like mine), you might want to lightly sand it or prime it with a fresh coat of paint to help the napkin adhere better.
Prep the napkin pieces
Take your napkins and separate the top layer. Some napkins are 2-ply and some are 3-ply. Make sure to pull off the very top patterned layer. (I have made the mistake of not doing this, and the napkin would not adhere properly!)


Next, you will want to cut general pieces to decoupage.
The sides of my box were nice and simple—smooth, straight lines that made it easy to apply the napkin. The lid, however, had a few more angles to think about. Still smooth, but with a bit more shape to navigate.
Whatever kind of box you’re working with, the goal is to cut your napkin to the general size of each section, leaving an inch or two in excess paper to trim later.
It’s a little like putting together pieces of a puzzle—just take your time and work one section at a time.
Decoupage the Napkin Pieces
Brush a thin, even layer of Mod Podge onto the area you’re working on.
Then, gently lay the napkin piece over the glued surface and, starting in the center, smooth out the wrinkles with your fingers.
As you continue to glue the napkin pieces to your box, carefully line up pattern edges to create a seamless look.


Now for a little controversy…
I like to use my fingers to smooth out the paper napkin. There is a method of using plastic wrap to cover the napkin and then work out the wrinkles.
But I actually like the wrinkles!
I think it gives the piece some nice texture.
So I use my fingers! Yes, the napkin can tear easily. But I find that if I am very gentle, I can coax out the bubbles to create the texture that I want.
Trim and Seal
Let everything sit for about 10 minutes and then trim the excess paper from the edges.
Then, add another thin coat of Mod Podge on top to seal. Make sure you get the edges too!
Continue until your whole piece is covered—or strategically decorated. Let dry and admire your handiwork!


Sonata Tip: Have fun playing with coordinating napkin patterns. Very often paper napkin patterns come in coordinated patterns so the work is already done for you!
Styling the Upcycled Box
Once my box was fully dry and gorgeous in its new blue and white attire, I tried it in a few spots around the house. I first placed it on the console table in our front entry. Instant wow!

Because it’s a bit of a larger decor piece, it stands strong on its own. But if you’re a “let’s layer everything” kind of girl (no judgment—I’m right there with you), it would also look stunning:
- On a bookcase with coffee table books and vintage pieces
- Centered on the dining room table next to a vase of fresh flowers
- Sitting pretty on top of the piano (especially if you have a mix of vintage finds and new pieces)
This piece adds a perfectly eclectic look and has become one of my favorite thrift store finds of the year!


My Favorite Paper Napkins
Through my decoupage adventures, I have become obsessed with paper napkins and all of their amazing patterns. Here are some of my favorites!

Thrifted Treasures to Decoupage
This technique doesn’t stop with boxes! From books to picture frames, the possibilities are endless. Here are some of my favorite thrift store finds for decoupage potential.
Glass Plates
Glass plates from your local thrift store are one of the best items to experiment with, especially for decoupage beginners. They’re usually inexpensive, come in all shapes and sizes, and their transparency makes them the perfect canvas for showing off pretty napkins or patterned paper.
Simply apply the design to the back of the plate (yes, the back!), so the image shows through the glass like a charming window of color and pattern. Once it’s dry and sealed, you still have a functional, wipeable front surface that’s perfect for display or light use.
You can get full project details HERE.

Candle Jar Lids
Ever notice how many thrifted candles are missing their wax but still have perfectly good wooden lids?
Next time you’re out thrift shopping, grab a few! These smooth, round lids are just waiting to become charming DIY coasters.
With a little sanding (if needed) and a bit of decoupage using pretty napkins or paper scraps, you can create unique pieces that protect your surfaces and show off your personal style.

Glass Bottles and Vases
From shapely vintage bottles to classic bud vases, the glass aisle at thrift stores is often brimming with possibilities. These bottles may look plain at first glance, but with a bit of decoupage magic, they’re ready for a total glow-up.
Find out more about this project HERE.

From Thrifted to Treasured
Here’s the good news—you don’t have to spend a fortune at big box stores to create a beautiful space. Thrift shopping gives you access to unique items at affordable prices, and with a little creativity and a little paint, you can turn particular items into some of the best things in your living space.
One of the best times to go thrifting? Early morning, mid-week. That’s when you’ll score the best stuff at a reasonable price. And if you’re looking for specific items (like trays, boxes, or books in good shape), keep a running list.
Next time you’re in a local store, whether it’s a vintage shop, local thrift shop, or even a flea market, take a second look at that odd little box, or plate, or frame. It might just be your next perfect piece—and at a much better price than anything from a retail store.

Because here’s the thing—creating a cozy home filled with thrifted home decor is about more than just decorating. It’s about the story, the transformation, and the joy of making something truly yours.
So go grab your Mod Podge, some napkins, and your favorite thrift store finds—because this is the thrift store decor glow-up you didn’t know you needed!
Don’t Forget! Check out the other patterned projects below from the Handcrafted Society!
Cheers!


A Little About Me
Hi! I’m missy. So happy to meet you!
“Decorate with Joy! Live with Happiness”
I truly believe that your home should be a reflection of your personality, a space where you feel free to express yourself and create a sanctuary that feels uniquely yours.
I love creating mood boards, hunting down unique home décor treasures, tackling easy DIY projects, and gathering with family and friends. Homes are meant to be enjoyed, filled with laughter, and shared with the people you love!
– cheers –

Don’t Forget to Pin It!
Pin the image below to your boards on Pinterest (just click the Pin button in the top left corner). You can also follow along with me on Pinterest!


Shop Till You Drop
Oh my word, Missy, this is fabulous! It doesn’t even look like the same piece. It looks like it was meant to be yours all along! I love the color napkins you chose and how you gave it a frsh feel. It’s beautiful and is the perfect complement to your decor. Sending you hugs and hoping you find lots of fun goodies to transform this season, CoCo
Thank you so much, CoCo! I really had fun with the Handcrafted challenge this month. Now I need more projects to decoupage. Wouldn’t it be fun to thrift in person with everyone in the Handcrafted Society? There’s a goal!
That box really needed a special makeover, and just look at what you were able to accomplish! Absolutely beautiful Missy! I need to go thrifting and look for something like this! Excellent post my friend!
Thanks, Michelle! Wouldn’t it be fun to go thrifting together! Ugh to long distances!
Beautiful Missy! I love the blue and white that you used. It totally transformed this piece.
Thanks, Wendy! I loved the challenge this month. Right up my alley!
LOVE!!! Leave it to you, oh pattern queen, do dress up your ‘bouge’y’ box with decopauge! I love it. It looks so good…like it was always meant to be that way. Super fun, Missy!
Oh, Rachel! You say the nicest things! Thank you so much!
What a great thrifted find! I adore how you completely transformed it with napkins! The color and pattern you chose are so pretty! Nothing better than taking someone else’s discarded item and turning it into a treasure for your home! Pinning now!
You are so right about turning someone’s trash into treasure. You are a master at it! Thank you for your kind words. This was such a fun project and I love sharing it!
Missy – This thrift store transformation is amazing. I particularly love the BLUE leopard print decoupage you added to the thrifted box. The vibrant blue is a nod to your signature style. Thanks for the inspiration!
Thanks, Anna! I think we all need a little blue leopard in our lives! lol! As always, so fun to share all of our handcrafted projects!
That turned out beautifully, I love the blue pattern, it’s so vibrant yet elegant at the same time. It’s amazing what you can do with paper napkins.
“Missy!”, “Missy!” Who else could this possibly belong to? (besides me of course 😉 . . . just saying . . . . .)
What a makeover! What vision! And you’ve got to love it when it all comes together!
LOL, Diane! Sometimes I think I stick out like a sore thumb. But I guess it is just a colorful thumb! Thank you for always making me smile!
This transformation is lovely I’d love to see you share it at https://tryit-likeit.com/link-party-it/
This turned out beautifully, Missy! I always feel inspired when I pop over here. 🙂
WOW WOW WOW! This turned out so lovely! The gold accents are just perfect. Featuring when my link party opens.
You are so sweet, Carol! Thank you so much!
Loved the creative thrift store decor ideas so inspiring and budget-friendly!