

How to Make DIY Wired Flower Birch Logs for Spring
Discover the joy of crafting DIY Wired Flower Birch Logs and add a touch of natural, woodland charm to your home.
Follow this simple step-by-step guide to create whimsical wired flowers atop rustic birch logs, perfect for welcoming spring’s beauty indoors. Bring the outdoors inside with this easy, creative project!

You may have heard me mention a group I belong to…the Hand Crafted Society! It’s this awesome group of talented bloggers who love getting together each month to craft with a shared theme or medium. It’s seriously cool to see how each of us interprets each project challenge differently!
This month’s material…wood!

As you wrap up reading my post, you’ll find some snapshots and links to all the projects these amazing ladies have cooked up. Trust me, it’s a blast browsing through all their creative ideas! Just click on the image or blog name to check out their full posts. Get ready to be wowed!
This blog contains affiliate links. This means a small commission is earned if you make a purchase by using provided links. The price you pay will be the same whether you use the affiliate link or go directly to the vendor’s website using a non-affiliate link.
If you are new to Sonata Home Design, WELCOME! I’m Missy and I blog about all things related to home decorating. I specialize in sharing easy DIYs for your home, along with home interior tips and tricks, and I’m passionate about helping you embrace color fearlessly in your space!
Birch Logs from Winter to Spring
The last of our January snowfall has finally melted away and I can’t wait to get started with decorating for the spring season!
But first, I need to pack away the remaining remnants of winter and, dare I say, Christmas decorations. Let’s just say, it is hard to pack outdoor Christmas planters when they are covered with ice and snow!
I’m starting to dismantle my winter planters and have stacks of birch logs that were used for holiday decor. Since our handcrafted project material is wood, I am inspired by the birch logs I used during the holidays and this plate from a set of dishes that belong to my mother. Time to marry natural logs and bright colors!


Supply List for DIY Wired Flower Birch Logs
This is a project that requires very little in the way of supplies. Pick up a few things and crank up your creativity!
- Birch Logs (These can be real or faux birch logs)
- Jute twine
- Green moss or Spanish moss
- Colored Aluminum Bendable Craft Wire: 12 gauge wire works best and can be found in the jewelry section of your local craft store. Even the dollar store carries a multi-colored wire pack. Make sure you include green wire and then add other colors that you like.


Looking for a quick way to buy supplies for this project? Simply shop the box below and check out directly from this site!
How to Make DIY Wired Flower Birch Logs
I would love to give you an exact step-by-step process for making the logs. However, there is not one way of doing it! It really depends on your creativity and instinct for what looks good to you! But here are some general guidelines!
Securing a Birch Bundle
First, create your bundle of birch branches. I used five logs of approximately the same size but you can use as many as you like. Of course, an odd number is always a good choice!
Stack the logs so you have several creating a bottom layer with the remaining logs stacked into the crevices of the bottom layer. A great idea is to use larger logs on the bottom and smaller logs on the top.

Next, take a long length of jute twine, about 2 to 3 feet, and wrap it around the entire log bundle several times. Circle and crisscross the twine for a random tethering of the whole thing. Secure the ends of the twine by tying them together in a knot on the underside of the bundle.
The primary goal is to secure the birch wood together so you can do this as many times as needed. Once this is done, you can wrap your log bundle with colored wire for a fun multi-colored look.

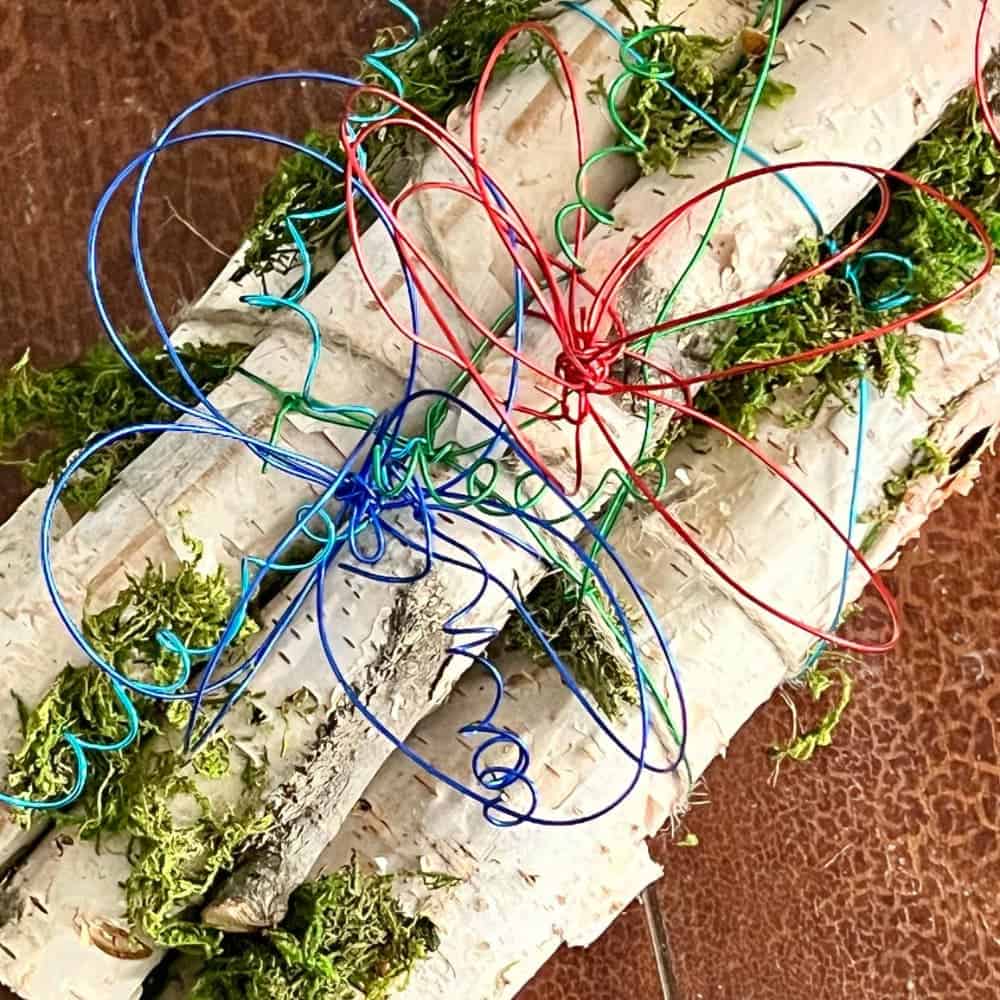
Creating Wired Flowers
I am no sculptor, but I had great fun creating my wire flowers. There is no wrong way of doing this!
When you remove the packaging from your bendable craft wire, you will see that the wire is already wound into a round shape. I used this to my advantage!
By simply splaying out 4 to 5 of these wire rings, you will see the outline of flower petals.
Hold those open rings in one hand, and start to wrap the end wire through the different loops. It’s a little like sewing all of the loops together at the bottom.


As you connect each loop, pull the wire taut so the loops stay securely connected. Once the loops are connected, wire your flower to a piece of wire that is connecting the logs. Bend and twist the “petals” into whatever flower shape you would like!
Every flower needs some leaves!

So, take a length of wire and twist one end around the base of a wire flower. Then, wrap the wire around a pencil. Withdraw the pencil and you are left with a whimsical curly-cue leaf!

You can make your flowers as large or small as you want. Whatever the size, it is a good idea to vary the placement to random spots on the logs for visual interest. Then you can create clusters of flower groupings on the entire log bundle
Adding a Bit of Nature
Last, add a bit of nature by tucking little wads of green moss or Spanish moss into the crevices of the logs.
My moss stayed attached quite nicely by just being tucked in underneath some of the wrapped wires. But you could certainly use a tacky glue to secure the moss into the log crevices.

Don’t you feel like an artist? You can now call yourself a sculptor!

Where to Display Your DIY Wired Flower Birch Logs
Do you ever finish a project and not know where to display it? I’ve got you covered! Here are some ideas!

- Display on a coffee table alongside stacks of books and other objet d’art.
- Style as a table centerpiece for a beautiful springtime table setting.
- Bring a touch of spring to your fireplace by placing your birch log bundle on the mantel.
- Display it on your front porch with some real leaves (as they emerge) and pine cones.
- Style in an area where you can find similar colors in your furniture or other decor.

Or display it beside the plate that inspires you!

It’s been fun guiding you through this project!
Birch logs are not just for Christmas decorating. This project is a great thing to incorporate into your springtime home decor. Now, go ahead and showcase your beautiful creation to add some springtime flair to your home!
Cheers!

Be sure to check out all of the creative wood-inspired projects of the Handcrafted Society below. Just click the links and start soaking in all of the creativity!


Don’t Forget to Pin It!
Pin the image below to your boards on Pinterest (just click the Pin button in the top left corner). You can also follow along with me on Pinterest!

More DIY Decor


What a fun idea, Kim! I love how you took something that is usually associated with winter and turned it into something that is perfect for spring. It’s such a festive way to kick off the season. Hugs, CoCo
Thank you, Coco! I think we are all ready for spring, aren’t we! Glad you could stop by! ~Missy
Gosh you are SO creative…I seriously don’t know how you come up with these amazing ideas!! This is truly a one-of-a-kind decor piece. So cool, Missy!
Thank you, Rachel! I really appreciate your kind words! This was one of those projects that just kind of evolved as I worked on it. Usually I am such a planner! I’m ready for spring! Thanks for stopping by!
Missy, I love the whimsical feel of your wired flower birch logs! So colorful and the moss is just the perfect touch! Pinning!
Thank you, Michelle! The moss was not in my original plan but it just seemed like the thing to do. Thank you!
Hi Missy – The wire flowers add the perfect spring touch to your birch logs! I love the light and airy design. Also, the moss is a great addition to the mini sculptures. Thanks for the great step by step instructions! (And photos)
Thank you, Anna! It was fun to see all the different projects. I am always amazed at what everyone comes up with!
Hi Missy! I recently saw birch logs at Hobby Lobby, and wondered how I could incorporate them into a Spring vignette! I came up empty, but you created a masterpiece! How did you think of using wire to make flowers? Love it and pinning now!
Thank you, Donna! I actually wrestled with what I was going to do for quite some time. Not sure how wire popped into my head but eventually it did!
Missy, I love your creativity and all of the fun colored wire. You certainly knew exactly what to do to brighten up these logs. Thanks for sharing.
Thank you, Wendy! This month’s challenge definitely had me thinking! It was fun!
Missy, how fun! I always admire your whimsical touches and use of color. Love how creative you are with projects.
Thank you so much, Tammy!
What a perfect melding of the birch logs and your Mom’s plate. It’s such a fun, light, bright between-ish display bringing in a bit of nature (not dark brnaches, but not flowers yet) topped your bright, happy personality!
Thank you, Diane! I appreciate you so much and am so glad to handcraft with you!
I love birch, Missy!! It’s one of my favorite trees. What a fun way to add a pop of color for spring with the wire, such a great transitional idea. Thanks for sharing!
Thank you,Kelly! I have to admit to a birch and aspen tree obsession! Fun to share Handcrafted with you!
Missy, what joy! I’ve always like your use of colour and whimsy touches. I adore your unique approach to tasks.
Thank you so much, friend!
So creative and clever!
Thank you so much, Amy! I so glad you liked it!
Missy, you are so creative! What a lovely and colorful way to carry the birch logs into spring! I love the whimsical touch paired with the natural logs!
Thank you so much, Kim! I think we are all ready for some spring decor!
I have bookmarked your website because this site contains valuable information in it. I am really happy with articles quality and presentation. Thanks a lot for keeping great stuff. I am very much thankful for this sitedespreseriale
You’re being featured at the Home Matters Link Party on Thursday at 9 pm. I hope you can drop by. https://lovemycottage.wpengine.com/
Wow! Thank you so much! I will definitely stop over!
Nice Work, Keep It Up.
You are really imaginative, Missy! What a beautiful and vibrant way to welcome spring with the birch logs! I adore the natural logs combined with the humorous touch!
Thank you, Michelle! Adding the moss wasn’t part of my original plan, but it felt like the right thing to do. Thanks again!
What a lovely addition to simple birch logs. This is so clever! And I love decorating with wood. Visiting from the Love Your Creativity linkup.