

How to Make a Mini DIY Tabletop Greenhouse
If you thought that the only way to get your own greenhouse was to build a massive structure in the backyard, think again! This blog post will teach you how to make a mini tabletop greenhouse that’s perfect for displaying plants and home decor.
This unique and inexpensive DIY project makes an excellent home decor piece for displaying your indoor plants. So grab your supplies and let’s get crafting!

This blog contains affiliate links. This means a small commission is earned if you make a purchase by using this link. The price you pay will be the same whether you use the affiliate link or go directly to the vendor’s website using a non-affiliate link.
My indoor plant “garden” is growing!
I’m no master gardener but I get a real thrill when I see new buds and growth on my indoor plants.
From propagating to transplanting, my plants are getting the star treatment these days!
What started as one “pandemic plant” has grown (literally) into a bevy of various plants that are scattered throughout the house.
I am always looking for unique ways to display plants.
In fact, check out my indoor plant garden project here!
I see adorable tabletop greenhouses in high-end plant boutiques and I love them.
So much so that I decided to make my own mini greenhouse!
Why DIY Mini Greenhouses?
DIY mini tabletop greenhouses offer a fantastic way to create your own growing season indoors. These simple structures provide the perfect environment for nurturing tender plants with daily TLC.
They’re not just practical; they’re also charming additions to your home decor, serving as unique displays year-round.
From holiday decorating to everyday greenery, a mini greenhouse is an easy way to bring a touch of nature indoors.
And this mini greenhouse project has open sides and an open top so you have easy access to your plant babies!
How to Make a DIY Greenhouse for Your Table
I made this project for under $10 using photo frames!
The next time you walk down the photo frame aisle at a dollar store, be sure to grab an assortment of frames!.
Here is what you need to make your small greenhouse.
Supplies
- (2) 8″ x 10″ photo frames
- (2) 4″ x 6″ photo frames
- (4) 5″ x 7″ photo frames
- Strong adhesive glue. You can use wood glue or a hot glue gun but I used E6000 glue for this project.
- Spray Paint

The different-sized frames do not have to match and can be different colors. However, the frames within the different sizes should match. For example, the 8 x 10s should match each other but can be a different style or color from the other frames.
Keep in mind…You can play around with different sizes of photo frames to create the silhouette that you want for this tabletop greenhouse. The width of photo frames can vary so you will want to play with what works for your project.
This is a great way to use old picture frames and you can find loads of frames at your local thrift store.
Constructing the Tabletop Greenhouse Frame
To start, remove any packaging, paper, or cardboard from the frames as well as the frame glass. For this project, you will be using only the frames themselves.
Using strong adhesive glue, take an 8 x 10 frame and glue one short side of the frame to the long side of a 4 x 6 frame to create an “L” shape.
Glue the other long side of the 4 x 6 to the short side of the second 8 x 10 frames and then, finally, glue the remaining sides of the frames.
You have now created a rectangular box with the photo frames.

Use some painter’s tape to hold the glued sides together while the glue dries.
Raise the Roof
Next, take two of the 5 x 7 frames, angle them together on top of the frame box, and glue them to the top of the box base, creating one-half of a pitched roof.
Once you get the angled frames glued together, be sure to hold it for a bit as it can slip easily if it hasn’t dried enough. This can be done by yourself but having a helper to hold the angled pieces can be very helpful.

Once the first half of the “roof” is glued and secured, glue the other two 5 x 7 frames to the base to complete the roof of the structure.
Use your glue to connect the frames at all the different connection points. Again, use painter’s tape to temporarily secure the glued sides together.
Let the structure sit for at least an hour to let the glue dry.

House Paint
Once dry, I gave my greenhouse a couple of light coats of Rust-Oleum hunter-green spray paint.
You could paint it any color you want. Green, black, and white are nice neutral colors that will be a great backdrop for your plants. However, you could go color-crazy with Christmas red, cobalt blue, or hot pink!

Creating Climate Control for Your Simple Greenhouse
Creating a stable climate inside your DIY tabletop greenhouse is a good idea for optimal plant growth. A great way to insulate your mini-environment is by using plastic wrap.
By covering the entire structure with a layer of plastic covering, you can create a warm environment and significantly reduce temperature fluctuations. This also enables you to protect your plants from drafts.
Just be sure to leave a little bit of ventilation to prevent moisture buildup, which can lead to diseases.
DIY Tabletop Greenhouse Ideas for Display
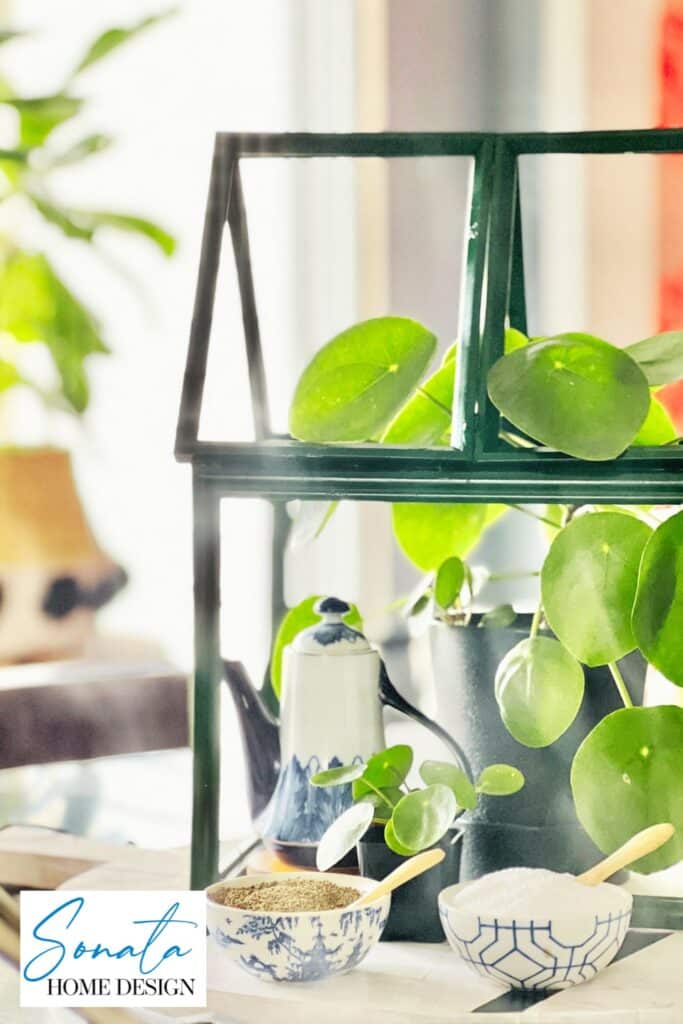
My Pilea money plant usually sits by the kitchen sink and soaks in all of the west exposure sunlight/
But in the colder winter months, she is not as happy sitting beside a cold window.
Tucking her inside the new tabletop greenhouse still gives her bright indirect light but in a warmer spot.

I love decorating my home with DIY projects and colorful decor. If you like budget-friendly decorating, I hope you subscribe to my blog so that you never miss one of my adventures.
I placed the greenhouse on a cutting board and added a charming blue and white teapot and two salt and pepper cellars.
You can display all sorts of plants and non-plant items in your greenhouse. Here are some other “filler” ideas:
- Herb garden
- Kitchen Garden: Pretty much the same thing as an herb garden but conveniently located in the kitchen!
- Succulents
- Plant seedlings and place the greenhouse grow lights
- Candles
- Faux greenery
- Mini tray or bowl for keys
- Cell phone charging station: A literal “house” for all of your electronic devices!
- Framed photographs
- Teacups and saucers
I love seeing the leaves peek out through the greenhouse roof. This little greenhouse sits on my kitchen island on a wood charcuterie and serves as a fantastic centerpiece!

A Christmas Tabletop Greenhouse
Give your own tabletop greenhouse some holiday spirit by decorating it for Christmas…with greenery of course!
Take small bundles of greenery with holly berries that are the same width as the roof frame and glue each end to the frame’s edges, creating a “thatched roof” effect!


Place a faux pillar candle inside a small green wreath and place it in the bottom of the decorated greenhouse.
How lovely to display on a side table, fireplace mantel, or guest room nightstand!

You can take this idea and adapt it for any holiday or season of the year. Valentine’s Day, Easter, Halloween, and Thanksgiving…you will be surprised at all of the indoor greenhouse ideas that you come up with!
Greenhouse Sweet Greenhouse
Who knew it was so easy to make a mini tabletop greenhouse to grow your favorite hobby plants indoors? Now that you have the essential details of how to create a wonderful indoor oasis, why not get creative and make one?

Design it in a way that compliments your home or office space, or gift to someone close who may enjoy the pleasure of having their own indoor garden.
Make one today and find yourself immersed in the joys of nurturing nature’s beauty!
Cheers!

Don’t Forget to Pin It!
Pin the image below to your boards on Pinterest (just click the Pin button in the top left corner). You can also follow along with me on Pinterest!


Plants in the Home
How to Make a Pebble Humidity Tray for Plants

Simple and Easy DIY Orchid Planter Ideas

Easy Dog Bowl Succulent Garden


Such a creative idea Missy. I love it.
Such a clever project! Your pilea looks fabulous…mine is struggling w/ the winter light up here.
Thanks, Jennifer! Fortunately, even with winter light, my pilea loves the kitchen window. So many little plant babies! Thanks so much for stopping by!
How cute is that? So creative!
Hi Dee! Thank you so much! I’m so glad you like the project!
What a genius idea! I love it. I think I have to try something like this. Thanks for the inspo. I found you over at The House on Silverado. Have a great day. XO- MaryJo
Hi MaryJo! Thank you so much for the kind words! This was a super fun (and easy!) project that is perfect for decorating after Christmas! So nice to meet you! (Love The House on Silverado!) Have a great week, MaryJo!
What a fun project, Missy!! This gets me so excited for Spring. I love the green color you chose to paint it. It can be used so many different ways! Thanks so much for sharing your creativity!
Thank you, Rachel! There is just something about green plants that says “Spring!” I’m so glad you liked the project!
Coming over from Farmhouse Friday link up party….your terrarium mini greenhouse is beautiful…what a creative idea! Enjoyed seeing that!
Oh, thank you, Christie! It was a fun project!
I found you from over at Farmhouse Friday link up…I’ve always loved terrariums and your mini greenhouse is beautiful, what a creative idea! Thanks for sharing!
Thank you so much, Christie! I appreciate your stopping over. I’m so glad you like the project!
I love this unique craft project, Missy! It’s perfect for Spring!! I am so excited to feature your post at this week’s Tuesday Turn About Link Party. Thank you so much for sharing!
Wow! I’m so excited! Thank you so much, Lynne! I love being a part of the Tuesday Turn About Link Party!
This is the cutest thing ever! What a creative project. Thanks so much for sharing with #MMBC. 🙂
This is so cute and what a great idea! I love it!
What a clever idea! Pinning!
This is such an inspiring and creative project! I love how you’ve taken something as simple as photo frames and turned them into a charming mini greenhouse that’s not only functional but also a beautiful decor piece. The detailed instructions make it easy to follow, and I can already imagine how versatile this DIY could be for different seasons or themes. Your tips on creating the perfect environment for indoor plants are super helpful too. I can’t wait to try this out and add a touch of greenery to my space! Thanks for sharing such a fun and budget-friendly idea! 🌿
I’m so glad you like the project, Anna! Give it a try! I would love to see it when you finish!
Oh I LOVE this! A plant is just a plant until you can tuck it inside a picture framed greenhouse! It makes such a cool statement piece!
Perfect quote, Donna!
Such a clever DIY, Missy and I love that you staged it for everyday and Christmas! Thanks for sharing! Creatively, Beth
Thank you, Beth!
Beautiful little idea and a great way to display your plants. I am saving this idea to make one. This post will be a feature this week. #HomeMattersParty
Thank you so much, Donna! I really appreciate it!
So cute! But I’m confused. I’m not understanding how the 8” side of the 8×10 frames lines up with the 6” side of the 4×6 frame. Help!
Hi Debby, I am so sorry to be slow in getting back to you! I was able to use the 4″ side of two 4 x 6 frames to run along the 8″ side of an 8 x 10 frame. Does that help? It took me a bit to figure out the best configuration but that is what worked for me. Let me know if you have any other questions!
Thank you. Yes, I see how that would work. Does the photo in your post show two 4×6 frames along the 8” side of the 8×10? It looks like only one frame on the end.
You are so creative! Thank you for sharing this with us on Farmhouse Friday 360. I’ll be featuring it tomorrow! Always love your links. pinned
Hi Cindy, I am slow in responding to this as we had some medical issues going on at our house. Thank you so much for featuring my project. It is truly appreciated!